Introduction to Azure AI and Azure AI Studio: Your Gateway to the Future of Artificial Intelligence

Featured

Please note: Only the graphics are generated by OpenAI Model: Dalle3;
the rest is me 😉

The age of artificial intelligence (AI) is upon us, with advancements being blistering. Microsoft’s Azure AI is at the forefront of this revolution, providing a comprehensive suite of tools and services that enable developers, data scientists, and AI enthusiasts to create intelligent applications and solutions. In this blog post, we will delve deep into Azure AI and explore Azure AI Studio, a powerful platform that simplifies the creation and deployment of AI models.

What is Azure AI?

Azure AI is a collection of cognitive services, machine learning tools, and AI apps designed to help users build, train, and deploy AI models quickly and efficiently. It is part of Microsoft Azure, the company’s cloud computing service, which offers a wide range of services, including computing, analytics, storage, and networking.

Azure AI is built on the principles of democratizing AI technology, making it accessible to people with various levels of expertise. Whether you’re a seasoned data scientist or a developer looking to integrate AI into your applications, Azure AI has something for you.

Key Components of Azure AI

Azure AI consists of several key components that cater to different AI development needs:

  1. Azure Machine Learning (Azure ML): This cloud-based platform for building, training, and deploying machine learning models. It supports various machine learning algorithms, including pre-built models for common tasks.
  2. Azure Cognitive Services: These are pre-built APIs for adding AI capabilities like vision, speech, language, and decision-making to your applications without requiring deep data science knowledge.
  3. Azure Bot Service: It provides tools to build, test, deploy, and manage intelligent bots that can interact naturally with users through various channels.

Introducing Azure AI Studio (In Preview)

Azure AI Studio, also known as Azure Machine Learning Studio, is an integrated, end-to-end data science and advanced analytics solution. It combines a visual interface where you can drag and drop machine learning modules to build your AI models and a powerful backend that supports model training and deployment.

Features of Azure AI Studio

  • Visual Interface: A user-friendly, drag-and-drop environment to build and refine machine learning workflows.
  • Pre-Built Algorithms and Modules: A library of pre-built algorithms and data transformation modules that accelerate development.
  • Scalability: The ability to scale your experiments using the power of Azure cloud resources.
  • Collaboration: Team members can collaborate on projects and securely share datasets, experiments, and models within the Azure cloud infrastructure.
  • Pipeline Creation: The ability to create and manage machine learning pipelines that streamline the data processing, model training, and deployment processes.
  • MLOps Integration: Supports MLOps (DevOps for machine learning) practices with version control, model management, and monitoring tools to maintain the lifecycle of machine learning models.
  • Hybrid Environment: Flexibility to build and deploy models in the cloud or on the edge, on-premises, and in hybrid environments.

Getting Started with Azure AI Studio

To begin using Azure AI Studio, you usually follow these general steps:

  1. Set up an Azure subscription: If you don’t already have one, create a Microsoft Azure account and set up a subscription.
  2. Create a Machine Learning resource: Navigate to the Azure portal and create a new resource.
  3. Launch AI Studio: Launch Azure AI Studio from the Azure portal once your resource is ready.
  4. Import Data: Bring your datasets from Azure storage services or your local machine.
  5. Build and Train Models: Use the visual interface to drag and drop datasets and modules to create machine-learning models. Split your data, select algorithms, and train your models.
  6. Evaluate and Deploy: Evaluate your trained models against test data and deploy them as a web service for real-time predictions or batch processing once satisfied with the performance.

Use Cases for Azure AI

Azure AI powers a variety of real-world applications, including but not limited to:

  • Healthcare: Predictive models for patient care, diagnosis assistance, and medical imaging analysis.
  • Retail: Personalized product recommendations, customer sentiment analysis, and inventory optimization.
  • Banking: Fraud detection, risk management, and customer service chatbots.
  • Legal: Documentation creation, Legal Briefs, and ability to analyze a case with or without bias.
  • Manufacturing: Predictive maintenance, quality control, and supply chain optimization.

Conclusion

Azure AI and Azure AI Studio are powerful tools in the arsenal of anyone looking to harness the power of artificial intelligence. With its comprehensive suite of services, Azure AI simplifies integrating AI into applications, while Azure AI Studio democratizes machine learning model development with its visual, no-code interface. The future of AI is bright, and platforms like Azure AI are more accessible than ever.

Azure AI not only brings advanced capabilities to the fingertips of developers and data scientists but also ensures that organizations can maintain control over their AI solutions with robust security, privacy, and compliance practices. As AI continues to evolve, Azure AI and Azure AI Studio will undoubtedly remain at the cutting edge, empowering users to turn their most ambitious AI visions into reality.

Until next time,

Rob

Azure Batch: A Comprehensive Guide

Azure Batch Example

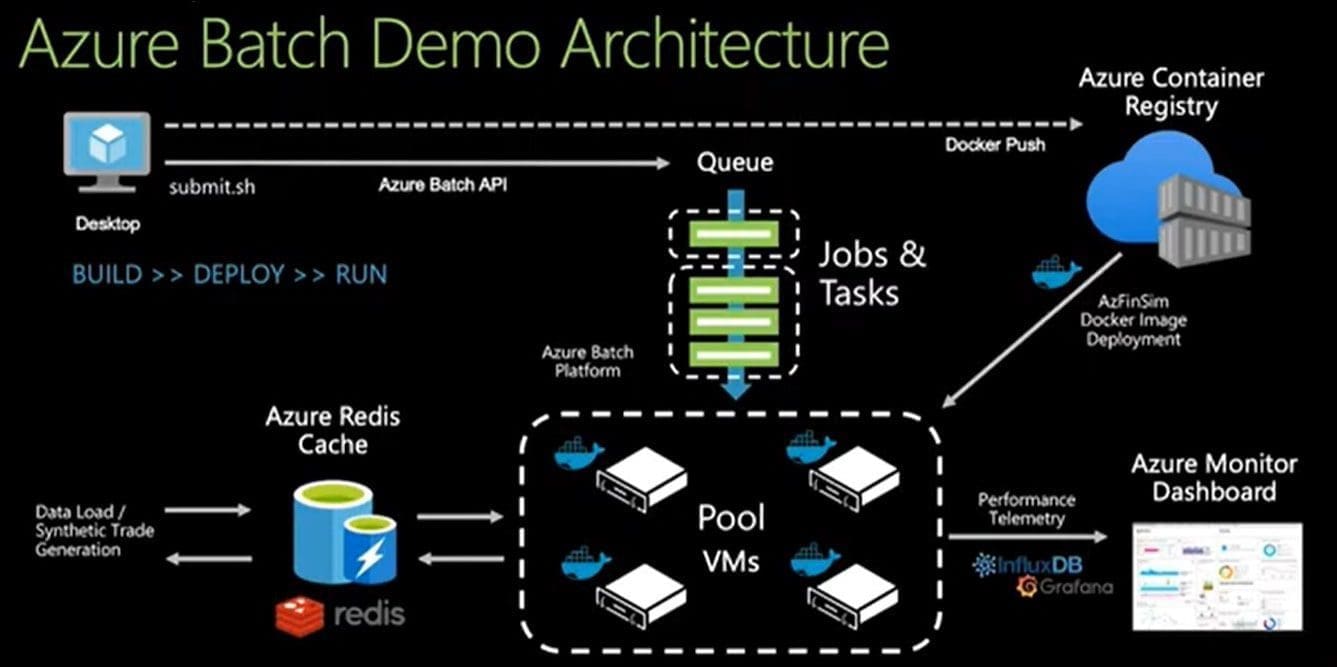
Azure Batch is a cloud-based platform offered by Microsoft Azure that enables users to run large-scale parallel and batch computing workloads. With Azure Batch, users can manage, schedule, and run their applications and tasks on a pool of virtual machines. This provides a flexible and scalable solution for businesses and organizations looking to run complex computing tasks in the cloud.

Key Features of Azure Batch

Scalability: Azure Batch allows users to scale their computing resources on demand, enabling them to handle even the largest computing workloads. The platform can automatically allocate and manage the virtual machines needed to run your tasks, ensuring that your applications have the resources they need to run smoothly.

Flexibility: Azure Batch supports a wide range of applications and languages, including .NET, Python, and Linux. This makes it easy for organizations to integrate their existing applications and tools with Azure Batch.

Monitoring and Management: Azure Batch provides real-time monitoring and management capabilities, making it easy to track your batch jobs’ progress and quickly identify and resolve any issues.

Cost-Effective: Azure Batch offers a pay-per-use pricing model, so you only pay for the resources you consume. This helps to keep costs down, making it an attractive solution for organizations looking to reduce their IT expenses.

How to Use Azure Batch

To get started with Azure Batch, you’ll need to create a Batch account in the Azure portal. Once your account is set up, you can create a pool of virtual machines to run your tasks on. These virtual machines can be managed and scaled using the Azure Batch API or the Azure portal.

Next, you’ll need to create a batch job to run your tasks on the virtual machines in your pool. A batch job is a collection of tasks executed on your pool’s virtual machines. You can submit your tasks to the job, and Azure Batch will automatically manage the distribution of the tasks across the virtual machines in your pool.

Once your batch job runs, you can monitor its progress in real-time using the Azure portal or the Azure Batch API. You can also retrieve detailed information about each task, such as its status and any errors that may have occurred during its execution.

Examples of Effective Usage

  • Use auto-scaling to save cost: Azure Batch provides an auto-scaling feature that automatically adds or removes compute nodes based on the demand for your applications. This helps you save cost by only paying for what you use and avoiding over-provisioning of compute resources. To enable auto-scaling, you can use the auto-pool and auto-scale features in the Azure portal or through the Azure Batch API.
  • Utilize the cloud-init script: You can use the cloud-init script to customize the behavior of your compute nodes. For example, you can use the script to install necessary software, configure firewall rules, or download data. The cloud-init script is executed every time a new compute node is created, ensuring that all nodes are consistently configured.
  • Make use of custom images: Azure Batch allows you to use custom images to deploy your applications, which can greatly reduce the time required to set up your
    environment. By creating a custom image with all the necessary software pre-installed, you can quickly create new compute nodes and start processing your data.
  • Take advantage of the task dependencies: Azure Batch provides the capability to specify task dependencies, which can help you ensure that tasks are executed in the correct order. You can use task dependencies to specify the order in which tasks are executed, or to make sure that a task is not executed until its dependencies have been completed.
  • Utilize the Job Preparation task: The Job Preparation task is a special task that runs on each compute node before the other tasks are executed. You can use the Job Preparation task to perform any necessary setup or configuration, such as installing software, copying data, or configuring firewall rules.
  • Monitor your jobs: Azure Batch provides robust monitoring capabilities that allow you to monitor the status of your jobs, tasks, and compute nodes. You can use the Azure portal, Azure Monitor, or the Azure Batch API to monitor your resources and get insights into the performance of your applications.

Conclusion

Azure Batch is a powerful and flexible platform for running large-scale batch computing workloads in the cloud. With its ability to scale resources on demand, support for a wide range of applications and languages, and real-time monitoring and management capabilities, it’s an attractive solution for organizations looking to take their computing to the next level. Whether you’re running scientific simulations, data processing, or any other type of batch computing workload, Azure Batch can help you get the job done quickly and efficiently.

Until next time, Rob

Azure Powershell – How to Build and Deploy Azure IaaS VMs

Throughout my career, my primary role has always been to make things more efficient and automated.  And now more than ever, automation is needed to manage and deploy IT services at scale to support our ever-changing needs.

In my opinion, one of the most convenient aspects of public cloud-based services is the ability to host virtual machines (VMs). Hosting VMs in the cloud doesn’t just mean putting your VMs in someone else’s datacenter. It’s a way to achieve a scalable, low-cost and resilient infrastructure in a matter of minutes.

What once required hardware purchases, layers of management approval and weeks of work now can be done with no hardware and in a fraction of the time. We still probably have those management layers though 🙁

Microsoft Azure is in the lead pack along with Google (GCP) and Amazon (AWS). Azure has made great strides over the past few years on in its Infrastructure as a Service (IaaS) service which allows you to host VMs in their cloud.

Azure provides a few different ways to build and deploy VMs in Azure.

  • You could choose to use the Azure portal, build VMs through Azure Resource Manager(ARM) templates and some PowerShell
  • Or you could simply use a set of PowerShell cmdlets to provision a VM and all its components from scratch.

Each has its advantages and drawbacks. However, the main reason to use PowerShell is for automation tasks. If you’re working on automated VM provisioning for various purposes, PowerShell is the way to go 😉

Let’s look at how we can use PowerShell to build all of the various components that a particular VM requires in Azure to eventually come up with a fully-functioning Azure VM.

To get started, you’ll first obviously need an Azure subscription. If you don’t, you can sign up for a free trial to start playing around. Once you have a subscription, I’m also going to be assuming you’re using at least Windows 10 with PowerShell version 6. Even though the commands I’ll be showing you might work fine on older versions of PowerShell, it’s always a good idea to work alongside me with the same version, if possible.

You’ll also need to have the Azure PowerShell module installed. This module contains hundreds of various cmdlets and sub-modules. The one we’ll be focusing on is called Azure.RM. This contains all of the cmdlets we’ll need to provision a VM in Azure.

Building a VM in Azure isn’t quite as simple as New-AzureVM; far from it actually. Granted, you might already have much of the underlying infrastructure required for a VM, but how do you build it out, I’ll be going over how to build every component necessary and will be assuming you’re beginning to work from a blank Azure subscription.

At its most basic, an ARM VM requires eight individual components

  1. A resource group
  2. A virtual network (VNET)
  3. A storage account
  4. A network interface with private IP on VNET
  5. A public IP address (if you need to access it from the Internet)
  6. An operating system
  7. An operating system disk
  8. The VM itself (compute)

In order to build any components between numbers 2 and 7, they must all reside in a resource group so we’ll need to build this first. We can then use it to place all the other components in. To create a resource group, we’ll use the New-AzureRmResourceGroup cmdlet. You can see below that I’m creating a resource group called NetWatchRG and placing it in the East US datacenter.

New-AzureRmResourceGroup -Name 'NetWatchRG' -Location 'East US'

Next, I’ll build the networking that is required for our VM. This requires both creating a virtual subnet and adding that to a virtual network. I’ll first build the subnet where I’ll assign my VM an IP address dynamically in the 10.0.1.0/24 network when it gets built.

$newSubnetParams = @{
'Name' = 'NetWatchSubnet'
'AddressPrefix' = '10.0.1.0/24'
}
$subnet = New-AzureRmVirtualNetworkSubnetConfig @newSubnetParams

Next, I’ll create my virtual network and place it in the resource group I just built. You’ll notice that the subnet’s network is a slice of the virtual network (my virtual network is a /16 while my subnet is a /24). This allows me to segment out my VMs

$newVNetParams = @{
'Name' = 'NetWatchNetwork'
'ResourceGroupName' = 'MyResourceGroup'
'Location' = 'West US'
'AddressPrefix' = '10.0.0.0/16'
'Subnet' = $subnet
}
$vNet = New-AzureRmVirtualNetwork @newVNetParams

Next, we’ll need somewhere to store the VM so we’ll need to build a storage account. You can see below that I’m building a storage account called NetWatchSA.

$newStorageAcctParams = @{
'Name' = 'NetWatchSA'
'ResourceGroupName' = 'NetWatchRG'
'Type' = 'Standard_LRS'
'Location' = 'East US'
}
$storageAccount = New-AzureRmStorageAccount @newStorageAcctParams

Once the storage account is built, I’ll now focus on building the public IP address. This is not required but if you’re just testing things out now it’s probably easiest to simply access your VM over the Internet rather than having to worry about setting up a VPN.

Here I’m calling it NetWatchPublicIP and I’m ensuring that it’s dynamic since I don’t care what the public IP address is. I’m using many of the same parameters as the other objects as well.

$newPublicIpParams = @{'Name' = 'NetWatchPublicIP''ResourceGroupName' = 'NetWatchRG''AllocationMethod' = 'Dynamic' ## Dynamic or Static'DomainNameLabel' = 'NETWATCHVM1''Location' = 'East US'}$publicIp = New-AzureRmPublicIpAddress @newPublicIpParams
Once the public IP address is created, I then need somehow to get connected to my virtual network and ultimately the Internet. I’ll create a network interface again using the same resource group and location again. You can also see how I’m slowly building all of the objects I need as I go along. Here I’m specifying the subnet ID I created earlier and the public IP address I just created. Each step requires objects from the previous steps.
$newVNicParams = @{
'Name' = 'NetWatchNic1'
'ResourceGroupName' = 'NetWatchRG'
'Location' = 'East US'
'SubnetId' = $vNet.Subnets[0].Id
'PublicIpAddressId' = $publicIp.Id
}
$vNic = New-AzureRmNetworkInterface @newVNicParams
Once we’ve got the underlying infrastructure defined, it’s now time to build the VM.
First, you’ll need to define the performance of the VM. Here I’m choosing the lowest performance option (and the cheapest) with a Standard A3. This is great for testing but might not be enough performance for your production environment.
$newConfigParams = @{
'VMName' = 'NETWATCHVM1'
'VMSize' = 'Standard_A3'
}
$vmConfig = New-AzureRmVMConfig @newConfigParams
Next, we need to create the OS itself. Here I’m specifying that I need a Windows VM, the name it will be, the password for the local administrator account and a couple of other Azure-specific parameters. However, by default, an Azure VM agent is installed anyway but does not automatically update itself. You don’t explicitly need a VM agent but it will come in handy if you begin to need more advanced automation capabilities down the road.
$newVmOsParams = @{
'Windows' = $true
'ComputerName' = 'NETWATCHVM1'
'Credential' = (Get-Credential -Message 'Type the name and password of the local administrator account.')
'ProvisionVMAgent' = $true
'EnableAutoUpdate' = $true
}
$vm = Set-AzureRmVMOperatingSystem @newVmOsParams -VM $vmConfig
Next, we need to pick what image our OS will come from. Here I’m picking Windows Server 2016 Datacenter with the latest patches. This will pick an image from the Azure image gallery to be used for our VM.
$newSourceImageParams = @{
'PublisherName' = 'MicrosoftWindowsServer'
'Version' = 'latest'
'Skus' = '2016-Datacenter'
'VM' = $vm
}$offer = Get-AzureRmVMImageOffer -Location 'East US' -PublisherName 'MicrosoftWindowsServer'
$vm = Set-AzureRmVMSourceImage @newSourceImageParams -Offer $offer.Offer
Next, we’ll attach the NIC we’ve built earlier to the VM and specify the NIC ID on the VM that we’d like to add it as in case we need to add more NICs later.
$vm = Add-AzureRmVMNetworkInterface -VM $vm -Id $vNic.Id
At this point, Azure still doesn’t know how you’d like the disk configuration on your VM. To define where the operating system will be stored, you’ll need to create an OS disk. The OS disk is a VHD that’s stored in your storage account. Here I’m putting the VHD in a VHDs storage container (folder) in Azure. This step gets a little convoluted since we must specify the VhdUri. This is the URI to the storage account we created earlier.
$osDiskUri = $storageAcct.PrimaryEndpoints.Blob.ToString() + "vhds/" + $vmName + $osDiskName + ".vhd"

$newOsDiskParams = @{
'Name' = 'OSDisk'
'CreateOption' = 'fromImage'
'VM' = $vm
'VhdUri' = $osDiskUri
}

$vm = Set-AzureRmVMOSDisk @newOsDiskParams
Ok, Whew! We now have all the components required to finally bring up our VM. To build the actual VM, we’ll use the New-AzureRmVM cmdlet. Since we’ve already done all of the hard work ahead of time, at this point, I simply need to pass the resource group name, the location, and the VM object which contains all of the configurations we just applied to it.
$newVmParams = @{
'ResourceGroupName' = 'NetWatchRG'
'Location' = 'East US'
'VM' = $vm
}
New-AzureRmVM @newVmParams

Your VM should now be showing up under the Virtual Machines section in the Azure portal. If you’d like to check on the VM from PowerShell you can also use the Get-AzureRmVM cmdlet.

Now that you’ve got all the basic code required to build a VM in Azure, I suggest you go and build a PowerShell script from this tutorial. Once you’re able to bring this code together into a script, building your second, third or tenth VM will be a breeze!

One final tip, in addition to managing Azure Portal through a browser, there are mobile apps for IOS and Android and now the new Azure portal app (Currently in Preview).  It gives you the same experience as the Azure Portal, without the need of a browser, like Microsoft Edge or Google Chrome.  Great for environments that have restrictions on browsing.

Until next time, Rob…

Windows Virtual Desktop now in the Wild – Public Preview Now Available

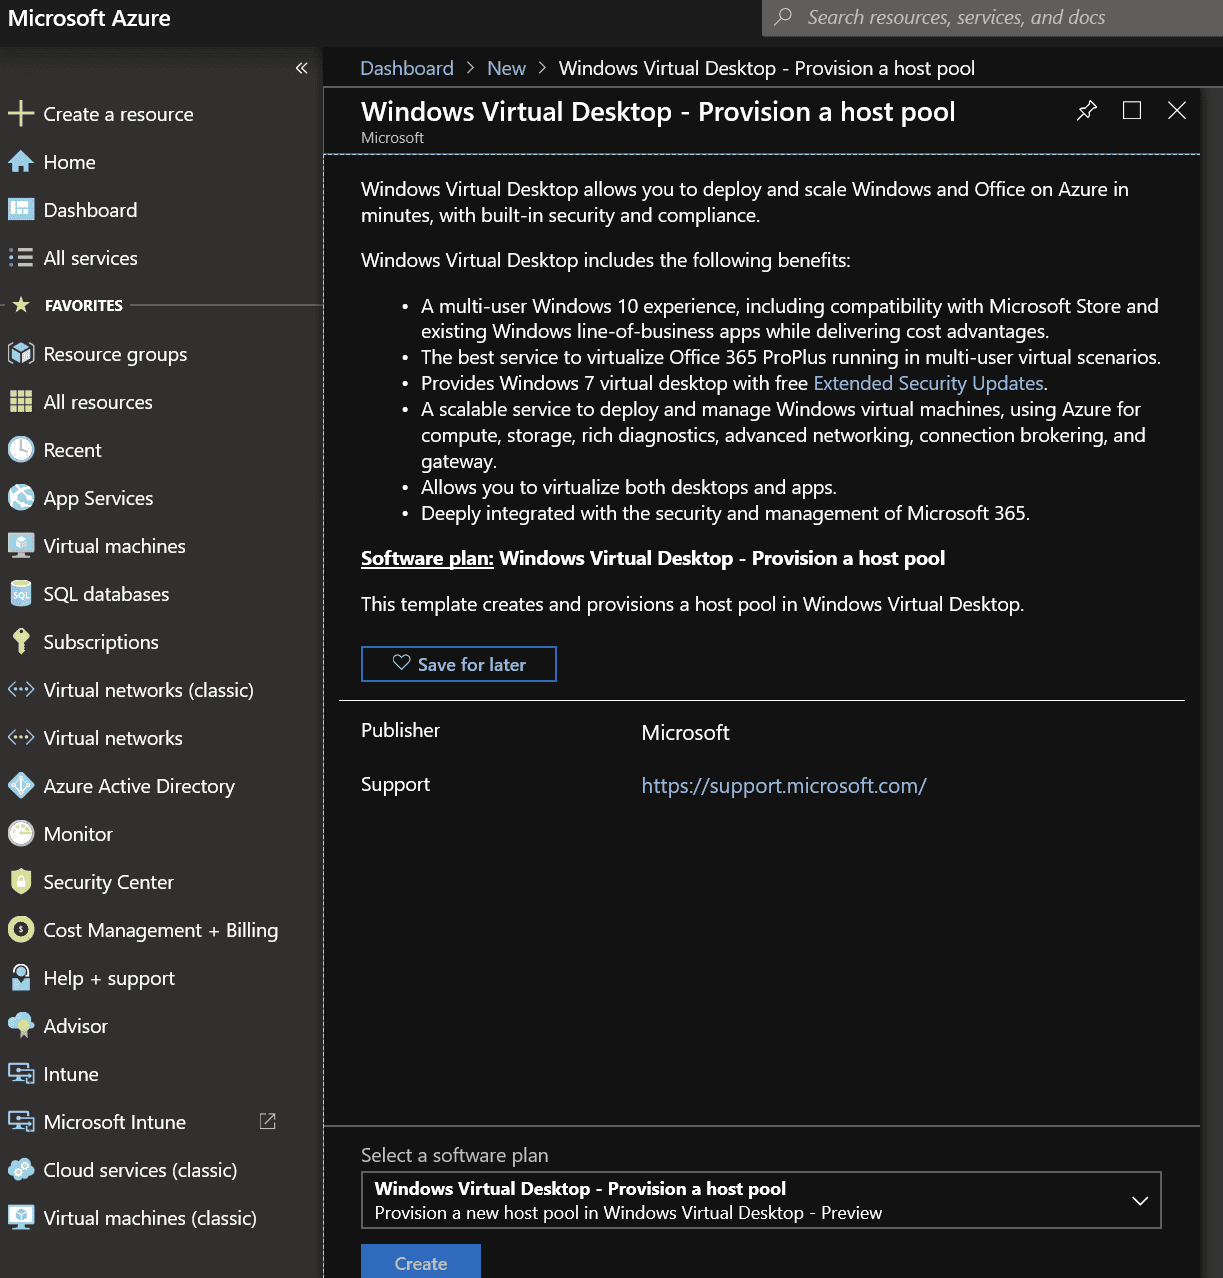
The Windows Virtual Desktop (WVD) product and strategy announced last September is finally here in public preview.  Something near and dear to my heart for the last 6 months.  I’ve been in private preview and had to keep a lid on it 🙂 Yea!!

What is it?

Simply put, it’s multi-session Windows 10 experience with optimizations for Office 365 ProPlus, and support for Windows Server Remote Desktop Services (RDS) desktops. It means users can deploy and scale Windows desktops on Azure and on-premise quickly.

The service brings together single-user Windows 7 VDI and multi-user Windows 10 and Windows Server RDS and is hosted on any of Azure’s virtual machine tiers or what you could call DaaS (Desktop as a Service) in a way.

Licensing

Microsoft is pricing WVD aggressively by charging only for the virtual machine costs; the license requirements for the Windows 7 and Windows 10 based services will be fulfilled by Microsoft 365 F1/E3/E, Windows 10 Enterprise E3/E5, and Windows VDA subscriptions. The Windows Server-based services are similarly fulfilled by existing RDS client access licenses. This means that for many Microsoft customers, there will be no additional licensing cost for provisioning desktop computing in the cloud.

The virtual machine costs can be further reduced by using Reserved Instances that commit to purchasing certain amounts of VM time in return for lower pricing.  All of this just means simpler licensing for Office and Windows as opposed to the crazy license models of the past.  I am not saying that crazy licensing models are gone but have gotten much simpler.

What’s the deal with Windows 7 and Support?

The new service will be available to the production environments in the by June before Windows 7 support ends in January 2020.

But, there is a big incentive, Windows 7 users will receive all three years of Extended Security Updates (ESU) at no extra cost. This should ease the cost of migration to the service; this is in contrast to on-premises deployments that will cost either $25/$50/$100 for the three years of ESU availability or $50/$100/$200, depending on the precise Windows license being used.

WVD and O365

WVD will also provide particular benefits for Office 365 users. In November last year, Microsoft bought a company called FSLogix that develops software to streamline application provisioning in virtualized environments.

Outlook (with its offline data store) and OneDrive (with its synchronized file system) represent particular challenges for virtual desktops, as both applications store large amounts of data on the client machine.  This data is expected to persist across VM reboots and redeployments. FSLogix’s software allows these things to be stored on separate disk images that are seamlessly grafted onto the deployed virtual machine. WVD will use this software for clients running Office 365, but this can be optional.

Liquidware and WVD

The technology of ProfileUnity and FlexApp only complement what Microsoft includes with FSLogix.  But do understand, if you need a simple soution for Profile Disk, then FSlogix is the way to go and save yourself some money. Over my next few blog posts, I plan to show how to set up WVD and a full walk-through of FSLogix running with WVD.

Sizing WVD?

Liquidware has a product called Stratusphere UX. It’s an EUC monitoring tool that allows you to properly size your Azure environment for WVD. This helps make smart decisions on migrations to WVD.  It doesn’t stop there, Stratusphere provides ongoing metrics and alerting that help IT Pro’s to continue to maintain a high performing WVD environment into the future.

How do I get it?

Azure Market Place 🙂 The preview is available in the US East 2 and US Central Azure regions; When GA is announced, it will be available in all regions.

In Microsoft’s eyes, its time to kickass and take names 😉

Check out my next post on WVD and FSLogix.

Until next time, Rob

MVPITPro Podcast – Ep5 – A Talk with Mike Bender from the Azure Cloud Ops Advocate Team

Join us for episode 3 of the new MVPIT Pro Podcast, featuring your hosts Andy Syrewicze from Altaro Software and myself    Jeffrey Snover @jsnover 

In this episode Andy and Rob Talk about:

  • Windows Server 2019 TP Build 17666
  • GDPR
  • Microsoft Loves Linux!
  • Steps that IT Pros can take today to become Microsoft MVPs
  • and much, much more!

Our special guest interview this episode features The one and only Jeffrey Snover, Microsoft Technical Fellow and Creator of PowerShell!

Enjoy 🙂 !!!

YouTube player

How Microsoft started it’s love for Linux ♥ – A History

Microsoft Love Linux

I’ve been using Linux distributions ever since I can remember.  It is arguably the most flexible operating systems in the world and it’s the foundation for many of the Virtual Appliances on the market today.  I’ve known some of the histories between Microsoft and Linux, but decided to dive in, research and give some good data points on

How Microsoft started it’s for love Linux”

Enjoy the ride down memory lane, Rob Continue reading

What Is Hyper-V? The Authoritative Guide

hyper-v

What Is Hyper-V? [Definition & Uses For It]

Whether you’re just beginning to look into virtualization platform options for your company, or you’re a new Hyper-V user trying to get up to speed, it can be a challenge to find all the information you need in one place. That’s why I created this guide—to give you an all-in-one resource you can bookmark and refer back to as often as you need to, so you can get up and running on Hyper-V more smoothly. Continue reading