Understanding Windows Azure Pack – How to guide with Express Edition on Nutanix – Windows Azure Pack Install – Part 5

To continue Windows Azure Pack series here is my next topic:  Installing and Configuring Windows Azure Pack

If you missed other parts of the series, check links below:
Part 1 – Understanding Windows Azure Pack
Part 2 – Understanding Windows Azure Pack – Deployment Scenarios
Part 3 – Understanding Windows Azure Pack – How to guide with Express Edition on Nutanix – Environment Prep
Part 4 – Deploying Service Provider Framework on Nutanix

Again to reiterate from my previous blog posts and set some context, Windows Azure Pack (WAP) includes the following capabilities: Continue reading

Understanding Windows Azure Pack – How to guide with Express Edition on Nutanix – Deploying Service Provider Foundation – Part 4

To continue the Windows Azure Pack series, here is my next topic: Installing and Configuring Service Provider Foundation
If you missed other parts of the series, check links below:
Part 1 – Understanding Windows Azure Pack
Part 2 – Understanding Windows Azure Pack – Deployment Scenarios
Part 3 – Understanding Windows Azure Pack – How to guide with Express Edition on Nutanix – Environment Requirements

There are 2 main steps to deploying WAP (Windows Azure Pack) on Nutanix:

  • Deploying SPF (Service Provider Foundation) – This blog post
  • Deploying Windows Azure Pack (coming soon)

Service Provider Foundation

SPF is provided with System Center 2012 – Orchestrator, a component of System Center 2012 R2. SPF exposes an extensible OData web service that interacts with System Center Virtual Machine Manager (SCVMM). This enables service providers and hosters to design and implement multi-tenant self-service portals that integrate IaaS (Infrastructure as a Service) capabilities available on System Center 2012 R2. The following picture shows how System Center w/SPF interacts with WAP to provide VM Cloud Services (see TechNet article for more info):
SPF-overview Service Provider FoundationAs with every installation, SPF requires additional software, features and server roles. Setup wizard checks prerequisites and reports about their status. Unfortunately, there is no “button” to install all of requirements automatically. I’ve wrote a script to automate this process (see below). Please note:  Don’t try to install SPF on the SCVMM Server. It’s not supported.
Requirements:

  • SQL Server 2012 SP1 or higher instance (Already Deployed)
  • OS – Windows Server 2012 R2 VM (Already Deployed)
    • 2 CPU Cores
    • 4 Gigs of RAM
    • 100 Gig OS Drive
  • Feature – Management OData Internet Information Services (IIS) Extension
  • Feature – NET Framework 4.5 features, WCF Services, and HTTP Activation.
  • Web Server (IIS) server. Include the following services:
    Basic Authentication
    Windows Authentication
    Application Deployment ASP.NET 4.5
    Application Development ISAPI Extensions
    Application Deployment ISAPI Filters
    IIS Management Scripts and Tools Role Service
  • Downloads:
    WCF Data Services 5.0 for OData V3
    ASP.NET MVC 4
  • Virtual Machine Manager 2012 R2 Console
  • Certificates: self-signed (wizard creates one automatically) or obtained SSL-certificate (recommended for production)

This script will install all requirements except SCVMM console (please note that SCVMM console has to be installed manually):

#IIS + Process activation model
Install-WindowsFeature Web-Asp-Net45,Web-Scripting-Tools,Web-Basic-Auth,Web-Windows-Auth,NET-WCF-Services45,Web-ISAPI-Ext,Web-ISAPI-Filter,Web-Scripting-Tools,WAS-Process-Model,WAS-Config-APIs,ManagementOdata
#Download and install WcfDataServices and AspNetMVC4
New-Item C:SPFRequirements -ItemType Directory
Invoke-WebRequest http://download.microsoft.com/download/8/F/9/8F93DBBD-896B-4760-AC81-646F61363A6D/WcfDataServices.exe -OutFile C:SPFRequirementswcfdatasvc.exe
Invoke-WebRequest http://download.microsoft.com/download/2/F/6/2F63CCD8-9288-4CC8-B58C-81D109F8F5A3/AspNetMVC4Setup.exe -OutFile C:SPFRequirementsaspnetmvc.exe
Set-Location C:SPFRequirements
.aspnetmvc.exe /quiet
Wait-Process aspnetmvc
.wcfdatasvc.exe /quiet
Wait-Process wcfdatasvc
Write-Host “All prerequisites are installed. Insert your SCVMM 2012 R2 DVD and install SCVMM Console manually. Then your environment will be ready for SPF installation

Required user accounts

We need to create a domain user account for the Service Provider Foundation application pools and a domain group that will be used for the permissions on the individual virtual directories created by the installer.
In my test lab I have created the following domain service accounts. They do not need any special rights other than domain users group.

  • spfadmnsvc – SPF Admin Web Service
  • spfprovsvc – SPF Provisioning Web Service
  • spfusagesvc – SPF Provisioning Web Service

And the following domain group

  • SPF_Admins – Group for SPF Administrators – Add all your WAP admins to this gorup

This admin group should be added to the local Administrators group on the SPF server.

Certificates

The Service Provider Foundation provides an extensible OData web service. Communications to this web service can and should be encrypted by SSL. SSL requires certificates. The Service Provider Foundation allows for self-singed certificates (for testing purposes) and certificates issued by a standalone Certificate Authority, an enterprise Certificate Authority or a public Certificate Authority. The Service Provider Foundation install defaults to self-signed (wizard creates one automatically) or you can obtain a certificate from a Public CA for production.

Installation

The Service Provider Foundation setup is on the System Center Orchestrator R2 media.

When installing, login to the SPF server as a user that has DBO/SA rights to the SQL 2012 instance that will be hosting SPF databases.

Mount ISO with Orchestrator and run SetupOrchestrator.exe and click on “Service Provider Foundation”
spf2 Service Provider Foundation
Click Install
spf3 Service Provider Foundation
Accept license terms and click Next
spf4 Service Provider Foundation
We’ve already installed all prerequisites using my script, so just click Next
spf5 Service Provider Foundation
Define SQL Server 2012 SP1 Instance Name , Port Number and click Next. If you unable to reach SQL Server you have to open firewall ports (https://support.microsoft.com/kb/968872) or check SQL TCP properties
spf6 Service Provider Foundation
Choose certificate type (For test lab, use self-signed and can be changed out later) and click Next
spf7 Service Provider Foundation

Define application pool credentials (spfadminsvc) and SPF_Admin Group that will have an access to SPF services and click Next. It’s best practices to create new domain accounts for every SPF services instead of using Network Service account.
spf8 Service Provider Foundation
Provider Web Service properties , click Next
spf9 Service Provider Foundation
Usage Web Service configuration, click Next
spf10 Service Provider Foundation
Windows updates + CEIP – yes (Microsoft needs your feedback 🙂 ), click Next
spf11 Service Provider Foundation
Click Install
spf12 Service Provider Foundation
Setup is complete!
spf13 Service Provider Foundation
Update SPF with the latest rollup (https://support.microsoft.com/en-us/kb/3021802) or use Windows Update.
Please note, the latest roll-up causing an issue in IIS and breaks SPF Web from working. I ran into this during my lab deployment. Check out this blog post on “System Center 2012 R2 : Update Rollup 4 breaks the SPF website” that fixes the issue.
This completes the SPF install. In a future blog post, we will be integrating SPF with WAP and SCVMM.
Additional links:
http://technet.microsoft.com/en-us/library/jj642895.aspx
http://technet.microsoft.com/en-us/library/dn266007.aspx
Next up in my series, Installing the Windows Azure Pack on Nutanix

Until next time, Rob….

Understanding Windows Azure Pack – How to guide with Express Edition on Nutanix – Environment Prep – Part 3

To continue the Windows Azure Pack series, here is my next topic:  Windows Azure Pack – Environment Prep
If you missed parts 1 or 2 in the series, check links below:
Part 1 – Understanding Windows Azure Pack
Part 2 – Understanding Windows Azure Pack – Deployment Scenarios

Environment Prep

In the first blog posting in this series we examined the capabilities and benefits of deploying WAP (Windows Azure Pack) in enterprise datacenters by first looking at Windows Azure, Microsoft’s public cloud offering.
In the second blog posting we looked at some of the terminology associated with WAP and we summarized two kinds of deployment scenarios on Nutanix: Express and Distributed architecture
Moving on…”Cloud” is the buzz word in all aspects of our computing life today, and more and more companies want to be able to offer the benefits of a “Cloud” environment to their on premises users. And by now, we should all know the Public Cloud (i.e. Azure, Amazon, etc.) might not suit everyone and is definitely not suited for all situations….That is where Nutanix and WAP standout;
Giving your the ability to have a predictable, scalable , highly available, high performing IaaS (Infrastructure as a Service) hybrid datacenter
This series is meant to be a guide to building your own WAP test lab on Nutanix and also provide you guidance for building out a production Nutanix WAP environment.

WAP Test Environment Requirements

Just to see functionally, you could deploy it the requirements on one host with Nutanix CE (Community Edition), but building this WAP environment on a Nutanix cluster will give you real world results.
In this series, we will be building 2 VM’s for the WAP test environment. The VM’s consist of SPF (Service Provider Foundation) Server and Windows Azure Pack Server.
In my test lab, I am using a 4 Node Nutanix NX3050 Cluster with Server 2012 R2 Hyper-V. This blog post assumes you have an Active Directory Domain and SCVMM (System Center Virtual Machine Manager) 2012 R2 up and running. It also assumes you have an empty SQL 2012 SP1 server built for hosting SPF, WAP and Tenant SQL Databases.

In this Post:

WAP Pre-requisites:

  • Virtual Machine Manager is installed and configured and:
    • Member of the Active Directory domain.
    • One or more SCVMM Clouds created in SCVMM (see below video)
    • One or more VM Networks created in SCVMM (see below video)
  • Service Provider Foundation
    • Windows Server 2012 R2
    • 4 Gigs of RAM
    • 2 CPU Cores
    • Database Storage
    • Member of the Active Directory domain
  • Windows Azure Pack Server
    • Windows Server 2012 R2
    • 4 Gigs of RAM
    • 2 CPU cores
    • 20 Gigs Data Storage
    • Database Storage
    • Member of the Active Directory domain
  • SQL Server is installed and running
    • Windows Server 2012 R2
    • SP1 or Above
    • 16 Gigs of RAM
    • 2 CPU Cores
    • 100 Gigs Data and Log Drive
    • With Mixed or SQL Authentication enabled
    • Member of the Active Directory domain

If you need help building a SCVMM 2012 R2 Server, check out my blog post on Installing SCVMM 2012 R2 on Nutanix (coming soon).
If you need help building a SQL 2012 Server, check out my blog post on Install SQL 2012 on Nutanix (coming soon)
If you need help deploying Hyper-V to a Nutanix cluster and joining the cluster to an Active Directory Domain, see my buddy Chris Brown’s Blog Video on Installing Hyper-V on Nutanix. This also covers adding it to SCVMM 2012 R2. He also has a great Hyper-VSCVMM Networking Overview. Another great NutanixMicrosoft resource.

Installing Hyper-V on Nutanix

Hyper-V Networking Overview


SCVMM Server / Fabric Prep

Account requirements

The Active Directory security account groups below are recommended as best practices when deploying WAP with SCVMM. Active Directory Security were created and mapped in SCVMM as Delegated Administrations. See screenshots below.

Self-Service Users (tenants) storage of VMs in the SCVMM Library

You will also need to create a library share, or create a folder in a library share that will serve as the storage location for tenants. Also, understanding that self-service users must have the Store and Re-Deploy permission to store their virtual machines in important. In my test lab, I created a Nutanix container (SMB Share) with compression attributes and presented it to SCVMM.

IMPORTANT RULES FOR LIBRARY SHARES
  • The library share location that you designate for stored virtual machines must be different from the shares that you designate as read-only resource locations for the private cloud.
  • The path or part of the path must be unique when compared to the user role data path that is specified for a self-service user role
  • You could also create entirely separate library shares with containers on Nutanix,like I did above
  • Understand that you will configure the stored virtual machine path and read-only library shares when you run the Create Cloud Wizard as shown video below.
  • The self-service user role data path is specified when you create a self-service user role or modify the properties of a self-service user role.
  • Make sure that one or more library shares exists that you can assign as the read-only library shares for self-service users to use.
  • The library shares that you designate as read-only resource locations for the private cloud must be unique when compared to the library share or shares that are used for stored virtual machines and for the user role data path that is specified for a self service user role.

Creating Tenant Storage and Private Cloud in SCVMM 2012 R2 on Nutanix

In high level, best practices is to have each tenant how their own separate storage containers as shown in below diagram. This will allow you to advertise available capacity, security boundaries, and apply attributes, like deduplication or compression on a per container basis and then tie it up to storage classifications in SCVMM.

Next is to create storage for you tenants. In Prism, create a new container with the name of your tenant, set an advertised capacity and add any storage attributes, like deduplication or compression depending on the type of workloads being hosted. See the below a video I produced with my buddy @Mike TME at Nutanix of the process:

YouTube player

If you have any questions about the prep, please comment below.
Yea, now we can finally deploy the WAP. Now the fun part starts…..
Next up in my series, Installing the Windows Azure Pack environment on Nutanix – Deploying SPF (Service Provider Foundation)

Understanding Windows Azure Pack – Part 1

With Azure Stack coming early next year….Windows Azure Pack is still of great value currently for service providers to organizations wanted to provide IaaS (Infrastructure as a service) and PaaS (Platform as a Service). I get asked all the time “What is Azure Pack”, “How do you deploy and what do I get started? etc…This blog series will give you the fundamental rundown on Windows Azure Pack and how it compares to Windows Azure Public Cloud…Deployment Scenarios on Nutanix and a how to deploy step-by-step Azure Pack express edition on Nutanix. So sit back and enjoy the show…
Windows Azure Pack

What is Windows Azure?

To understand what Windows Azure Pack is, you first need to be familiar with Windows Azure, Microsoft’s public cloud platform. To understand what Windows Azure is all about, check out the Azure website, but here are some key points of Windows Azure:

  • Windows Azure for service hosting and management, low-level scalable storage, computation and networking
  • Microsoft SQL Services for a wide range of database services and reporting
  • Microsoft .NET Services which are service-based implementations of familiar .NET Framework concepts such as workflow and access control
  • Live Services for a consistent way for users to store, share and synchronize documents, photos, files and information across their PCs, phones, PC applications and Web sites
  • Microsoft SharePoint Services and Microsoft Dynamics CRM Services for business content, collaboration and rapid solution development in the cloud.

As a cloud platform from Microsoft that provides a wide range of different services, Windows Azure lets you build, deploy, and manage solutions for almost any purpose you can imagine. In other words, Windows Azure is a world of unlimited possibilities. Whether you’re a large enterprise spanning several continents that needs to run server workloads, or a small business that wants a website that has a global presence, Windows Azure can provide a platform for building applications that can leverage the cloud to meet the needs of your business…
So now, Let’s look at the definition that Microsoft uses for describing Windows Azure:
Windows Azure is an open and flexible cloud platform that enables you to quickly build, deploy, and manage applications across a global network of Microsoft-managed datacenters. You can build applications using any language, tool, or framework. And you can integrate your public cloud applications with your existing IT environment.
This definition tells us that Windows Azure is a cloud platform, which means you can use it for running your business applications, services, and workloads in the cloud. But it also includes some key words that tell us even more:

  • Open – Windows Azure provides a set of cloud services that allow you to build and deploy cloud-based applications using almost any programming language, framework, or tool.
  • Flexible – Windows Azure provides a wide range of cloud services that can let you do everything from hosting your company’s website to running big SQL databases in the cloud. It also includes different features that can help deliver high performance and low latency for cloud-based applications.
  • Microsoft-managed – Windows Azure services are currently hosted in several datacenters spread across the United States, Europe, and Asia. These datacenters are managed by Microsoft and provide expert global support on a 24x7x365 basis.
  • Compatible – Cloud applications running on Windows Azure can easily be integrated with on-premises IT environments that utilize the Microsoft Windows Server platform.

Windows Azure provides businesses with four basic categories of cloud-based services:

  • Compute services
  • Network services
  • Data services
  • App services

At the core of the Windows Azure platform is its ability to execute applications running in the cloud. Windows Azure currently provides four different models for doing this: Web Sites, Virtual Machines, Cloud Services, and Mobile Services. Together these four approaches comprise the compute services portion of the Windows Azure platform, and they can either be used separately or combined together to build more complex solutions that can meet specific business needs.
Now, let’s go though some the main options on Windows Azure….
Windows Azure Web Sites is a scalable, secure, and flexible platform you can use for building web applications that run your business, extend the reach of your brand, and draw in new customers. It has an easy-to-use self-service portal with a gallery of the world’s most popular web solutions including .DotNetNuke, CakePHP, DasBlog, WordPress, and many others. Or you can simply create a new website from scratch and then install a tool like WebMatrix—a free, lightweight web development tool that supports the latest web technologies such as ASP.NET, PHP, HTML5, CSS3, and Node. You can use WebMatrix to create websites and publish applications for Windows Azure. And if you use Microsoft Visual Studio as a development environment, you can download and install a Windows Azure SDK so you can build applications that can take advantage of the scalable cloud computing resources offered by Windows Azure…
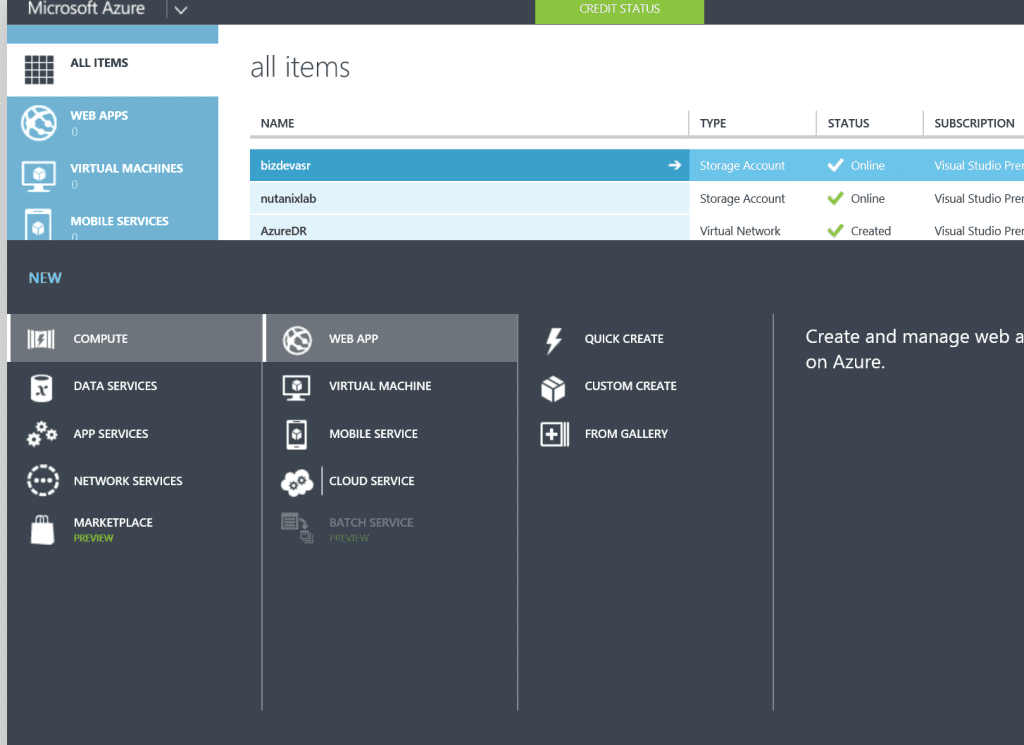
Creating a new website with Windows Azure is so easy we have to show you how to do it. Begin by logging on to the Windows Azure Management Portal at https://manage.windowsazure.com using your Microsoft Account username and password. Then select the Compute, Web App tab on the left and either click Quick Create or click the from Gallery button on the command bar as shown here:
Windows Azure PackThe command bar then expands, as shown in the next figure, and allows you to quickly create a new website with no additional configuration, a custom website with either a new or existing database, or a new web application based on an application framework, blog engine, template, or any other app available in the Windows Azure gallery…
Windows Azure Virtual Machines is a scalable, on-demand IaaS platform you can use to quickly provision and deploy server workloads into the cloud. Once deployed, you can then configure, manage, and monitor those virtual machines, load-balance traffic between them, and connect them to other Windows Azure Cloud Services running web roles and worker roles. You can copy virtual hard disks (VHDs) from your on-premises environment into Windows Azure to use as templates for creating new virtual machines. And you can copy VHDs out of Windows Azure and run them locally in your datacenter.
You can create new virtual machines from a standard image available in the Windows Azure gallery. Standard images are included for current versions of Windows Server and for different flavors of Linux. Standard images are also available for Microsoft SharePoint, Microsoft SQL Server, Microsoft Dynamics and Microsoft BizTalk Server pre-installed on Windows Server. Standard images are a great way of quickly provisioning new virtual machines, but you can also use images you created on-premises to deploy new virtual machines.
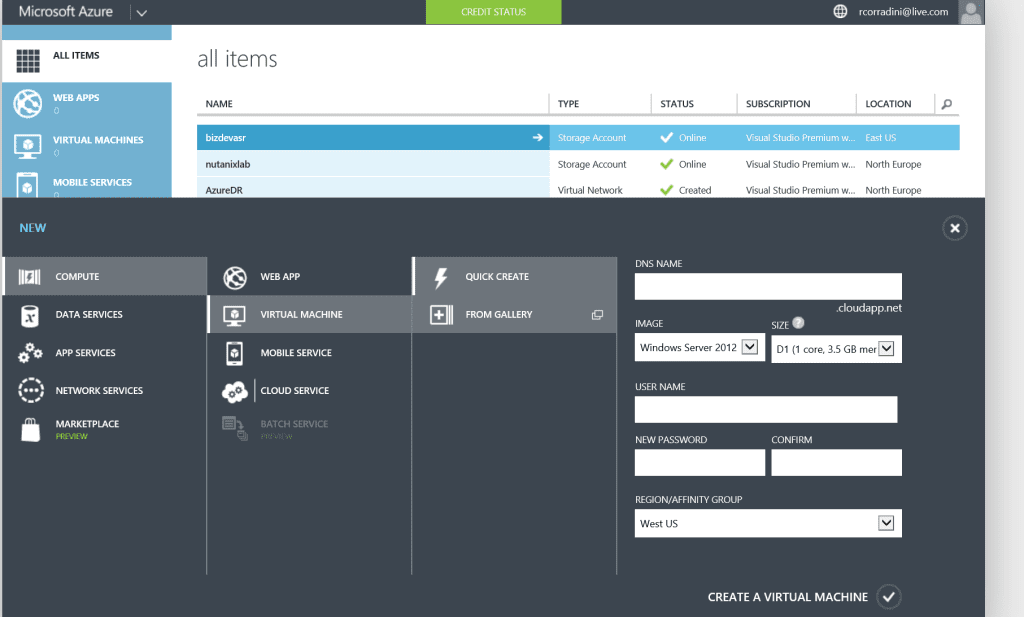
Creating a new virtual machine in Windows Azure is easy. Just open the Windows Azure Management Portal and select Compute, and then Virtual Machine tab on the left. The command bar expands and displays two options for creating virtual machines: Quick Create or From Gallery.
The Quick Create option lets you create a new virtual machine which you can configure later. As shown below, all you need to specify for this option is the DNS name for your virtual machine, the image to use as a template for your virtual machine, the size of the virtual machine (number of cores and memory), a user name and password for administrative access to the virtual machine, and the region or affinity group to which the virtual machine should be assigned:
Windows Azure Pack
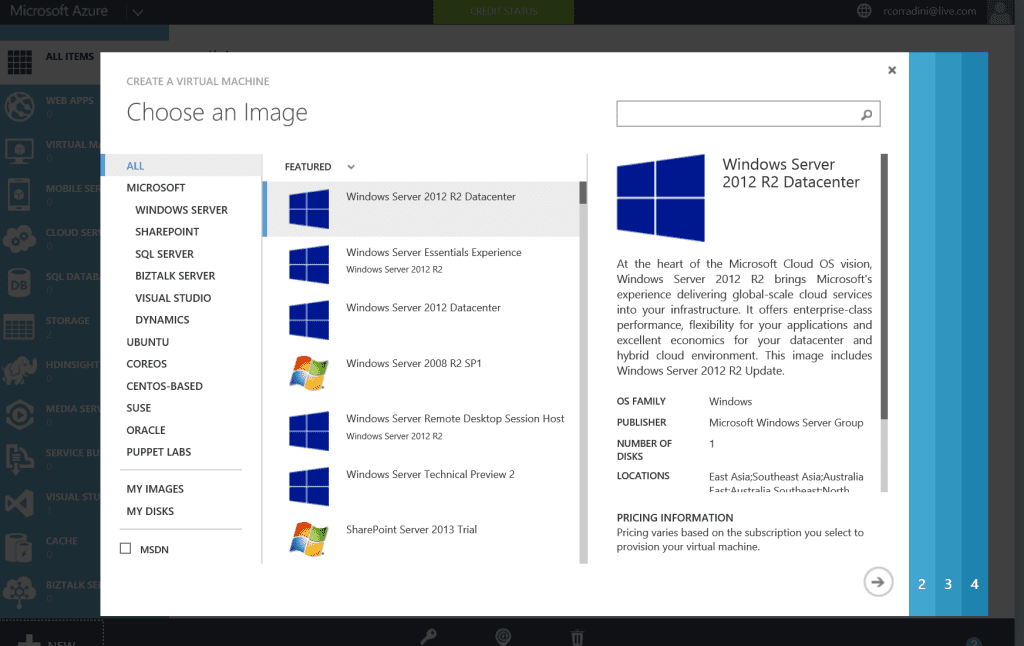
The other option, called From Gallery, lets you create a virtual machine by specifying advanced options presented in a series of pages. The first page shown below allows you to choose an image to be used as a template when creating your virtual machine…
Windows Azure Pack

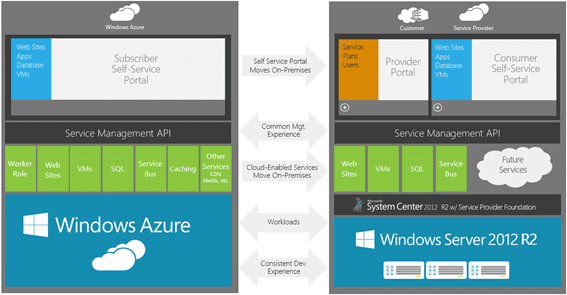
Windows Azure Pack vs. Windows Azure

Let’s again review the definition that Microsoft uses for describing Windows Azure:
Windows Azure is an open and flexible cloud platform that enables you to quickly build, deploy, and manage applications across a global network of Microsoft-managed datacenters. You can build applications using any language, tool, or framework. And you can integrate your public cloud applications with your existing IT environment.
Now let’s examine how Microsoft describes Windows Azure Pack. First, here’s how they define Windows Azure Pack on their Server and Cloud Platform site:
The Windows Azure Pack is a collection of Windows Azure technologies available to Microsoft customers at no additional cost. Once installed in your datacenter, the Windows Azure Pack integrates with System Center and Windows Server to help provide a self-service portal for managing services such as websites, Virtual Machines, and Service Bus; a portal for administrators to manage resource clouds; scalable web hosting; and more.
Next, here’s how Microsoft defines Windows Azure Pack in the TechNet Library:
Windows Azure Pack for Windows Server is a collection of Windows Azure technologies, available to Microsoft customers at no additional cost for installation into your data center. It runs on top of Windows Server 2012 R2 and System Center 2012 R2 and, through the use of the Windows Azure technologies, enables you to offer a rich, self-service, multi-tenant cloud, consistent with the public Windows Azure experience.
Comparing these various definitions and reading the linked resources enables us to conclude the following about how Windows Azure Pack compares to Windows Azure:

  • Both platforms provide a set of cloud services that allow you to build and deploy cloud-based applications using almost any programming language, framework, or tool. But while Windows Azure provides a broad range of several dozen different cloud services, Windows Azure Pack provides only a subset of these services, primarily Web Sites, Virtual Machines and Service Bus.
  • Cloud applications running on either platform can easily be integrated with on-premises IT environments that utilize Windows Server to enable you to build hybrid solutions.
  • While Windows Azure is hosted in globally distributed datacenters managed by Microsoft, Windows Azure Pack is something you can deploy within your own datacenter.
  • And lastly the upcoming Azure Stack will be in full parity with Windows Azure…See my Azure Stack Article

To summarize, Windows Azure Pack lets you bring some of the capabilities of the Windows Azure public cloud platform right into your own datacenter by leveraging your existing infrastructure based on Windows Server and System Center.
In the next article of this series we’ll examine different deploying scenarios with Nutanix for Windows Azure Pack in your datacenter.

Heading to Microsoft Ignite 2015…stay tuned….

Well, its been crazy days lately.  I am leaving for Microsoft Ignite 2015 in a few days.  My last few weeks been filled getting demo’s ready around Exchange, SQL, Azure Pack, and SCOM. Ignite is the biggest customer event of the year. My company Nutanix is a gold sponsor at the event this year and we plan to show off all of our Reference Architectures (i.e. Lync, SQL, etc.). We also are going to demo our new support of ISCSI on ESXi.


Continue reading

SQL 2012 AlwaysON Feature….What is it? How does it work?

As a Microsoft Solutions Architect, part of my job is to help the teams with solutions around the Microsoft stack.  Today, a colleague of mine reached out to me about the new SQL Server AlwaysOn feature that part of SQL 2012 and how it compared to SQL 2008 clustering….So I started with this topic to bring some understanding around it:

SQL Server AlwaysON
Prior to SQL Server 2012, SQL Server had several high availability and disaster recovery solutions for an enterprise’s mission critical databases such as failover clustering, database mirroring, log shipping or combinations of these. Each solution typically has a major limitation, in the case of failover clustering for example, its configuration is very tedious and complex and you arguably have single shared storage or single point of failure.

Database mirroring is relatively easy to configure in comparison with failover clustering, but you can have only one database in a single mirroring setup and you cannot read from the mirrored database. Log shipping does not provide automatic failover (higher availability) though it be used for disaster recovery with some expected data loss.

SQL Server AlwaysOn

SQL 2012 AlwaysOn Diagram

SQL Server 2012  introduced a new feature called AlwaysOn which combines the best of failover clustering and database mirroring and overcomes major of the limitations imposed in failover clustering or a database mirroring setup.

AlwaysOn is a High Availability (HA) and Disaster Recovery (DR) solution in SQL Server 2012 which improves high availability and protects data of your mission critical applications. AlwaysOn is the common name for two high availability and disaster recovery solutions:

AlwaysOn Failover Cluster Instance (FCI)
This is an enhancement to the existing SQL Server failover clustering (which is based on Windows Server Failover Cluster (WSFC)) which provides higher availability of SQL Server instance after failover. Some of the enhancements in AlwaysOn Failover Cluster Instance over the existing SQL Server failover clustering are:

  • Multisite failover clustering
  • Flexible failover policies to better control instance failover
  • Improved diagnostics capabilities out of the box

AlwaysOn Availability Group (AG)

This is a new HA/DR feature  in SQL 2012 and combines best of failover clustering and database mirroring. It allows you to create a group of databases which failover together as a unit from one replica/instance of SQL Server to another replica/instance of SQL Server in the same availability group. Each availability group that we create, allows you to create one (and only) availability group listener which is nothing but a Virtual Network Name (VNN) to be used by clients to connect to the availability group.

The AlwaysOn availability group is based on Windows Server Failover Cluster (WSFC) and hence you need to install the failover clustering feature on each server/replica and create a failover cluster adding all these server/replicas before you can start enabling/creating the availability group.

Availability Groups Compared To Traditional SQL Server Failover Clustering
In a typical SQL Server failover cluster (at the instance level), you will have two nodes/instances (Active-Passive or Active-Active) connected to shared storage drives. Though SQL Server failover clustering has been good and is used in many deployments for higher availability and disaster recovery, it has several limitations and pain points, such as:

  • The process of setting up SQL Server failover clustering is tedious and complex – there are some 30-40 steps that you have to perform missing any of those steps can result in hours of additional work. This is why setting up SQL Server failover clustering is only recommended to be performed by highly experienced professionals.
  • Both the nodes are connected to a shared storage drive; though these drives might have their own failover mechanisms we still can have a single point of failure.
    One of the nodes is idle all the time in case of Active-Passive cluster (recommended) and hence resources are underutilized. Though you have an Active-Active failover cluster this is not recommended as after failover one node will have double the load from both the cluster setup/applications.
  • The infrastructure and configuration of each node should be exactly same as other nodes and mimic each other.
  • You cannot distribute or load balance your read-write load from read only load on multiple nodes.
  • An AlwaysOn availability group is superior to SQL Server failover clustering because the configuration, deployment and management is relatively simple and all the nodes/replicas will a copy of the databases and hence there is no shared storage or a single point of failure. You can have readable secondary and hence you can route your read-only load to a secondary replica and the read-write load to primary replica and hence have better utilization of your hardware resources.

How Availability Group differs from database mirroring
Database mirroring (at database level) can be set up in either synchronous mode or asynchronous mode but not both in a single mirroring setup.

  1. Synchronous Commit mode (high-safety) : The transaction logs are hardened at both the principal server as well as at the mirror server before commit acknowledgement is returned to the client; it may introduce some latency but ensures no data loss after failover. In this mode you can also set automatic failover and for that you need another instance which will work as a witness and performs the job of role switching.
  2. Asynchronous Commit mode (high performance) : The principal server hardens the transaction log at the principal server and returns the commit acknowledgement to client without waiting for transaction log hardening acknowledgement to be received from the mirror server. Transaction log hardening at the mirror server happens in an asynchronous manner.

These all sound like good solutions, but like SQL Server failover clustering, it has also several limitations:

  1. You can have only one database in a single mirroring session/setup, though you can define multiple mirroring sessions/setups (one for each database) but it is not possible to have a group of databases failover together.
  2. Databases on mirror server are always in recovery mode and hence you cannot read from a mirrored database (though you can create a database snapshot and read from it but but would only reflect data till the particular point in time when it was created).
  3. You cannot load balance your read-write requests on one server and read-only on another server.
  4. You can have only one mirror server; you cannot have one for higher availability (synchronous commit mode) and one for disaster recovery (asynchronous commit mode) in one single mirroring session, although you can combine it with log shipping for disaster recovery.

An AlwaysOn availability group is recommended over database mirroring as this overcomes several limitations imposed in database mirroring, for example with an AlwaysOn availability group:

  1. You can have multiple mirrored instance/nodes/replicas (up to four secondaries apart from one primary replica) with a combination of synchronous commit mode and asynchronous commit mode both at the same time. The replica set up in synchronous commit mode can be used for higher availability (or for automatic failover) and the replica set up in asynchronous commit mode can be used for disaster recovery.
  2. You can combine two or more database together and failover them as a unit, you don’t need to do it for each database separately as you were doing in case of database mirroring.
  3. You can offload the read-only load from the primary replica to the secondary by configuring the secondary as readable. In this way you can have better utilization of secondary replica’s hardware resources.
  4. You can also offload backup operations from the primary replica to the secondary replica and hence have less workload/IO on the primary replica and better utilization of the secondary replica’s hardware.

So…as you can see….it is a welcomed feature in SQL Clustering technologies.  It reminds me a lot of the Exchange Available Groups for DB introduced in Exchange 2010.  There are some new upcoming features being announced for SQL AlwaysON at Ignite from what I hear.  Do we have SQL Azure integration coming?

Until next time, Rob…