Nutanix App for Splunk – Just Released

nutanix-US Nutanix App for Splunk

Nutanix App for Splunk

A Video Walkthrough on installation, configuration and demo of the Nutanix App for Splunk.  Also, included is demo of Splunk Mobile running the Nutanix App versys Safari running Prism. To learn more about Splunk, and details on this app, check out Andre’s Leibovici @andreleibovici blog post.  Happy Splunking 🙂

Until next time, Rob…

Nutanix NOS 4.6 Released….

On February 16, 2016, Nutanix announced the Acropolis NOS 4.6 release and last week was available for download. Along with many enhancements, I wanted to highlight several items, including some tech preview features.

Continue reading

NPP Training series – How does it work – CVM – Software Defined

To continue NPP training series here is my next topic:  How does it work – CVM – Software Defined

If you missed other parts of my series, check out links below:
Part 1 – NPP Training series – Nutanix Terminology
Part 2 – NPP Training series – Nutanix Terminology
Cluster Architecture with Hyper-V

Data Structure on Nutanix with Hyper-V
I/O Path Overview
Drive Breakdown

To give credit, most of the content was taken from Steve Poitras’s “Nutanix Bible” blog as his content is the most accurate and then I put a Hyper-V lean to it. Also, he just rocks…other than being a Sea Hawks Fan :).

Software-Defined
Nutanix CVM

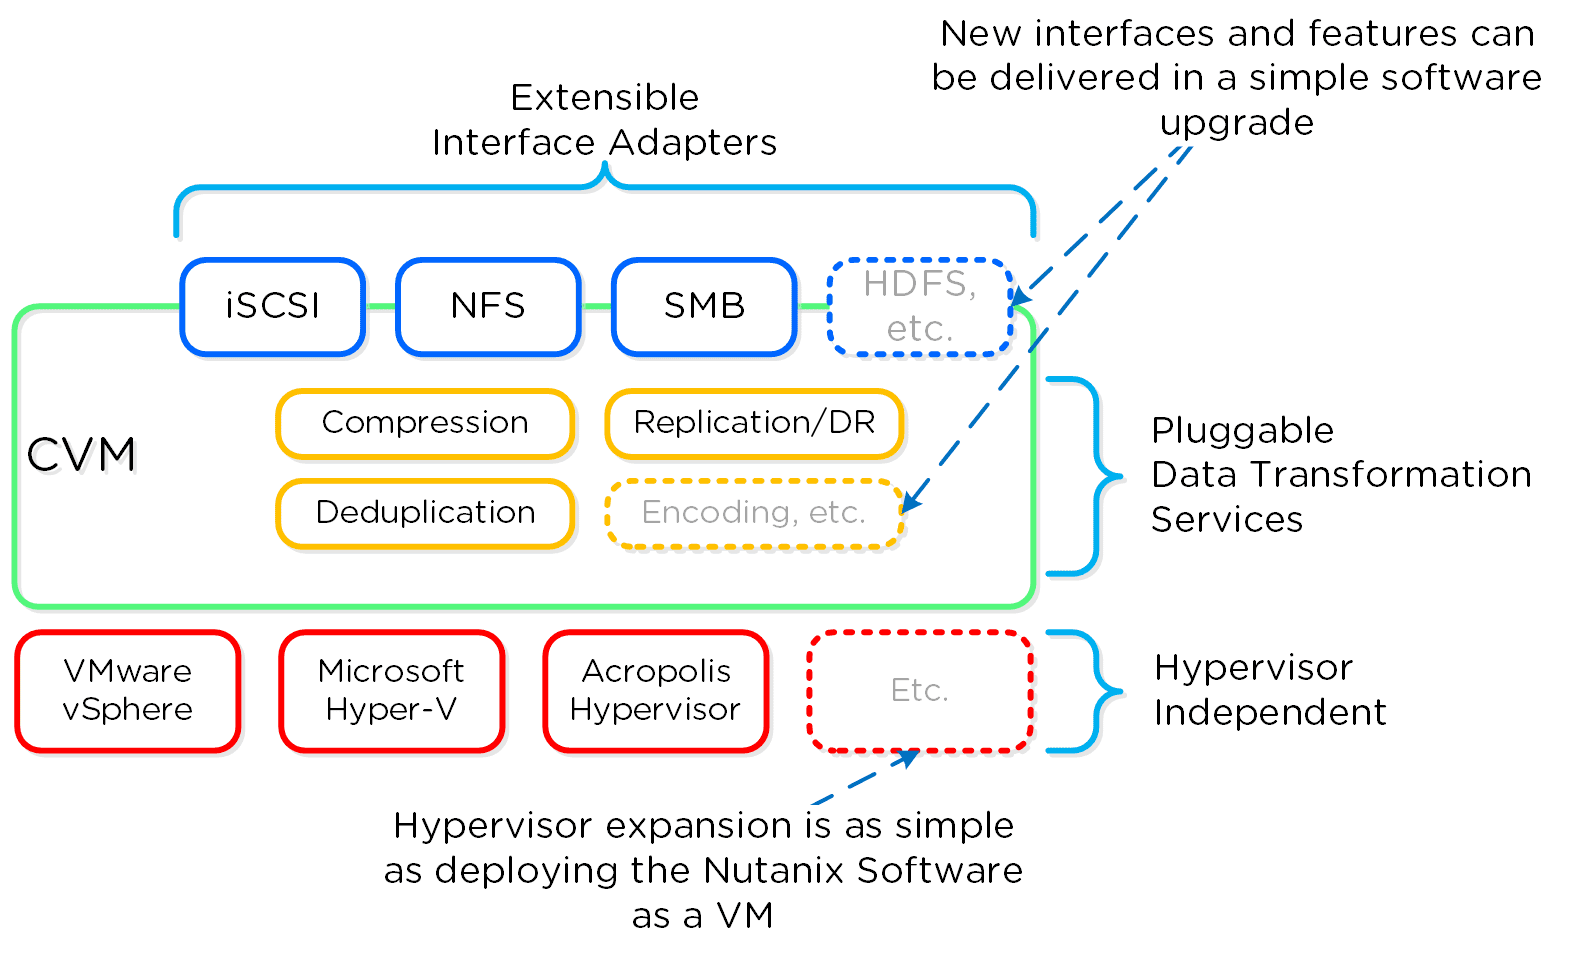
As mentioned before (likely numerous times), the Nutanix platform is a software-based solution which ships as a bundled software + hardware appliance.  The controller VM or what we call the Nutanix CVM is where the vast majority of the Nutanix software and logic sits and was designed from the beginning to be an extensible and pluggable architecture. A key benefit to being software-defined and not relying upon any hardware offloads or constructs is around extensibility.  As with any product life-cycle, advancements and new features will always be introduced.

By not relying on any custom ASIC/FPGA or hardware capabilities, Nutanix can develop and deploy these new features through a simple software update.  This means that the deployment of a new feature (e.g., deduplication) can be deployed by upgrading the current version of the Nutanix software.  This also allows newer generation features to be deployed on legacy hardware models. For example, say you’re running a workload running an older version of Nutanix software on a prior generation hardware platform (e.g., 2400).  The running software version doesn’t provide deduplication capabilities which your workload could benefit greatly from.  To get these features, you perform a rolling upgrade of the Nutanix software version while the workload is running, and you now have deduplication.  It’s really that easy.

Similar to features, the ability to create new “adapters” or interfaces into Distributed Storage Fabric is another key capability.  When the product first shipped, it solely supported iSCSI for I/O from the hypervisor, this has now grown to include NFS and SMB for Hyper-V.  In the future, there is the ability to create new adapters for various workloads and hypervisors (HDFS, etc.).

And again, all of this can be deployed via a software update. This is contrary to most legacy infrastructures, where a hardware upgrade or software purchase is normally required to get the “latest and greatest” features.  With Nutanix, it’s different. Since all features are deployed in software, they can run on any hardware platform, any hypervisor, and be deployed through simple software upgrades.

The following figure shows a logical representation of what this software-defined controller framework (Nutanix CVM) looks like:Nutanix CVMNext up, NPP Training Series – How does it all work – Disk Balancing

Until next time, Rob…

Nutanix NOS 4.5 Released…

Hi all…It’s been a few weeks since my last blog post. I’ve been busy with some travel to Microsoft Technology Centers and working on the Nutanix Ready Program.  Yesterday, Nutanix released NOS 4.5.  This exciting upgrade adds some great features..  Sit back and get ready to enjoy the ride…release notes below.

customLogo NOS 4.5

Table 1. Terminology Updates
New TerminologyFormerly Known As
Acropolis base softwareNutanix operating system, NOS
Acropolis hypervisor, AHVNutanix KVM hypervisor
Acropolis APINutanix API and Acropolis API
Acropolis App Mobility FabricAcropolis virtualization management and administration
Acropolis Distributed Storage Fabric, DSFNutanix Distributed Filesystem (NDFS)
Prism ElementWeb console (for cluster management); also known as the Prism web console; a cluster managed by Prism Central
Prism CentralPrism Central (for multicluster management)
Block fault toleranceBlock awareness

What’s New in Acropolis base software 4.5

Bandwidth Limit on Schedule

  • The bandwidth throttling policy provides you with an option to set the maximum limit of the network bandwidth. You can specify the policy depending on the usage of your network.

Note: You can configure bandwidth throttling only while updating the remote site. This option is not available during the configuration of remote site.

Cloud Connect for Azure

  • The cloud connect feature for Azure enables you to back up and restore copies of virtual machines and files to and from an on-premise cluster and a Nutanix Controller VM located on the Microsoft Azure cloud. Once configured through the Prism web console, the remote site cluster is managed and monitored through the Data Protection dashboard like any other remote site you have created and configured. This feature is currently supported for ESXi hypervisor environments only.

Common Access Card Authentication

  • You can configure two-factor authentication for web console users that have an assigned role and use a Common Access Card (CAC).

Default Container and Storage Pool Upon Cluster Creation

  • When you create a cluster, the Acropolis base software automatically creates a container and storage pool for you.

Erasure Coding

  • Complementary to deduplication and compression, erasure coding increases the effective or usable cluster storage capacity. [FEAT-1096]

Hyper-V Configuration through Prism Web Console

  • After creating a Nutanix Hyper-V cluster environment, you can use the Prism web console to join the hosts to the domain, create the Hyper-V failover cluster, and also enable Kerberos.

Image Service Now Available in the Prism Web Console

  • The Prism web console Image Configuration workflow enables a user to upload ISO or disk images (in ESXi or Hyper-V format) to a Nutanix AHV cluster by specifying a remote repository URL or by uploading a file from a local machine.

MPIO Access to iSCSI Disks (Windows Guest VMs)

  • Acropolis base software 4.5 feature to help enforce access control to volume groups and expose volume group disks as dual namespace disks.

Network Mapping

  • Network mapping allows you to control network configuration for the VMs when they are started on the remote site. This feature enables you to specify network mapping between the source cluster and the destination cluster. The remote site wizard includes an option to create one or more network mappings and allows you to select source and destination network from the drop-down list. You can also modify or remove network mappings as part of modifying the remote sites.

Nutanix Cluster Check

  • Acropolis base software 4.5 includes Nutanix Cluster Check (NCC) 2.1, which includes many new checks and functionality.
  • NCC 2.1 Release Notes

NX-6035C Clusters Usable as a Target for Replication

  • You can use a Nutanix NX-6035C cluster as a target for Nutanix native replication and snapshots, created by source Nutanix clusters in your environment. You can configure the NX-6035C as a target for snapshots, set a longer retention policy than on the source cluster (for example), and restore snapshots to the source cluster as needed. The source cluster hypervisor environment can be AHV, Hyper-V, or ESXi. See Nutanix NX-6035C Replication Target in Notes and Cautions.

Note: You cannot use an NX-6035C cluster as a backup target with third-party backup software.

Prism Central Can Now Be Deployed on the Acropolis Hypervisor (AHV)

  • Nutanix has introduced a Prism Central OVA which can be deployed on an AHV cluster by leveraging Image Service features. See the Web Console Guide for installation details.
  • Prism Central 4.5 Release Notes

Prism Central Scalability

  • By increasing memory capacity to 16GB and expanding its virtual disk to 260GB, Prism Central can support a maximum of 100 clusters and 10000 VMs (across all the clusters and assuming each VM has an average of two virtual disks). Please contact Nutanix support if you decide to change the configuration of the Prism Central VM.
  • Prism Central 4.5 Release Notes
  • Prism Central Scalability, Compatibility and Deployment

Simplified Add Node Workflow

  • This release leverages Foundation 3.0 imaging capabilities and automates the manual steps previously required for expanding a cluster through the Prism web console.

SNMP

  • The Nutanix SNMP MIB database includes the following changes:
    • The database includes tables for monitoring hypervisor instances and virtual machines.
    • The service status table named serviceStatusTable is obsolete. Analogous information is available in a new table named controllerStatusTable. The new table has a smaller number of MIB fields for displaying the status of only essential services in the Acropolis base software.
    • The disk status table (diskStatusTable), storage pool table (storagePoolInformationTable), and cluster information table include one or more new MIB fields.
  • The SNMP feature also includes the following enhancements:
    • From the web console, you can trigger test alerts that are sent to all configured SNMP trap receivers.
    • SNMP service logs are now written to the following log file: /home/nutanix/data/logs/snmp_manager.out

Support for Minor Release Upgrades for ESXi Hosts

  • Acropolis base software 4.5 enables you to patch upgrade ESXi hosts with minor release versions of ESXi host software through the Controller VM cluster command. Nutanix qualifies specific VMware updates and provides a related JSON metadata upgrade file for one-click upgrade, but now customers can patch hosts by using the offline bundle and md5sum checksum available from VMware, and using the Controller VM cluster command.

Note: Nutanix supports the ability to patch upgrade ESXi hosts with minor versions that are greater than or released after the Nutanix qualified version, but Nutanix might not have qualified those minor releases. Please see the the Nutanix hypervisor support statement in our Support FAQ.

VM High Availability in Acropolis

  • In case of a node failure, VM High Availability (VM-HA) ensures that VMs running on the node are automatically restarted on the remaining nodes within the cluster. VM-HA can optionally be configured to reserve spare failover capacity. This capacity reservation can be distributed across the nodes in chunks known as “segments” to provide better overall resource utilization.

Windows Guest VM Failover Clustering

  • Acropolis base software 4.5 supports configuring Windows guest VMs as a failover cluster. This clustering type enables applications on a failed VM to fail over to and run on another guest VM on the same or different host. This release supports this feature on Hyper-V hosts with in-guest VM iSCSI and SCSI 3 Persistent Reservation (PR).

Tech Preview Features

Note: Do not use tech preview features on production systems or storage used or data stored on production systems.

File Level Restore

  • The file level restore feature allows a virtual machine user to restore a file within a virtual machine from the Nutanix protected snapshot with minimal Nutanix administrator intervention.

Note: This feature should be used only after upgrading all nodes in the cluster to Acropolis base software 4.5.

What’s New in Prism Central

Prism Central for Acropolis Hypervisor (AHV)

Nutanix has introduced a Prism Central VM which is compatible with AHV to enable multicluster management in this environment. Prism Central now supports all three major hypervisors: AHV, Hyper-V, and ESXi.

Prism Central Scalability

The Prism Central VM requires these resources to support the clusters and VMs indicated in the table.

 
Prism Central vCPU
Prism Central Memory (GB, default)Total Storage Required for Prism Central VM (GB)Clusters SupportedVMs Supported (across all clusters)Virtual disks per VM
482565050002

Release Notes | NCC 2.1

Learn More About NCC Health Checks

You can learn more about the Nutanix Cluster Check (NCC) health checks on the Nutanix support portal. The portal includes a series of Knowledge Base articles describing most NCC health checks run by the ncc health_checks command.

What’s New in NCC 2.1

NCC 2.1 includes support for:

  • Acropolis base software 4.5 or later
  • NOS 4.1.3 or later only
  • All Nutanix NX Series models
  • Dell XC Series of Web-scale Converged Appliances

Tech Preview Features

The following features are available as a Tech Preview in NCC 2.1.

Run NCC health checks in parallel

  • You can specify the number of NCC health checks to run in parallel to reduce the amount of time it takes for all checks to complete. For example, the command ncc health_checks run_all –parallel=25 will run 25 of the health checks in parallel.

Use npyscreen to display NCC status

  • You can specify npyscreen as part of the ncc command to display status to the terminal window. Specify –npyscreen=true as part of the ncc health_checks command.

New Checks in This Release

Check NameDescriptionKB Article
check_disksCheck whether disks are discoverable by the host. Pass if the disks are discovered.KB 2712
check_pending_rebootCheck if host has pending reboots. Pass if host does not have pending reboots.KB 2713
check_storage_heavy_nodeVerify that nodes such as the storage-heavy NX-6025C are running a service VM and no guest VMs.
Verify that nodes such as the storage-heavy NX-6025C are runningthe Acropolis hypervisor only.
KB 2726
KB 2727
check_utc_clockCheck if UTC clock is enabled.KB 2711
cluster_version_checkVerifiy that the cluster is running a released version of NOS or the Acropolis base software. This check returns an INFO status and the version if the cluster is running a pre-release version.KB 2720
compression_disabled_checkVerify if compression is enabled.KB 2725
data_locality_checkCheck if VMs that are part of a cluster with metro availability are in two different datastores (that is, fetching local data).KB 2732
dedup_and_compression_enabled_containers_checkChecks if any container have deduplication and compression enabled together.KB 2721
dimm_same_speed_checkCheck that all DIMMs have the same speed.KB 2723
esxi_ivybridge_performance_degradation_checkCheck for the Ivy Bridge performance degradation scenario on ESXi clusters.KB 2729
gpu_driver_installed_checkCheck the version of the installed GPU driver.KB 2714
quad_nic_driver_version_checkCheck the version of the installed quad port NIC driver version.KB 2715
vmknics_subnet_checkCheck if any vmknics have same subnet (different subnets are not supported).KB 2722

Foundation Release 3.0

This release includes the following enhancements and changes:

  • A major new implementation that allows for node imaging and cluster creation through the Controller VM for factory-prepared nodes on the same subnet. This process significantly reduces network complications and simplifies the workflow. (The existing workflow remains for imaging bare metal nodes.) The new implementation includes the following enhancements:
    • A Java aplet that automatically discovers factory-prepared nodes on the subnet and allows you to select the first one to image.
    • A simplified GUI to select and configure the nodes, define the cluster, select the hypervisor and Acropolis base software versions to use, and monitor the imaging and cluster creation process.

Customers may create a cluster using the new Controller VM-based implementation in Foundation 3.0. Imaging bare metal nodes is still restricted to Nutanix sales engineers, support engineers, and partners.

  • The new implementation is incorporated in the Acropolis base software version 4.5 to allow for node imaging when adding nodes to an existing cluster through the Prism GUI.
  • The cluster creation workflow does not use IPMI, and for both cluster creation and bare-metal imaging, the host operating system install is done within an “installer VM” in Phoenix.
  • To see the progress of a host operating system installation, point a VNC console at the node’s Controller VM IP address on port 5901.
  • Foundation no longer offers the option to run diagnostics.py as a post-imaging test.  Should you wish to run this test, you can download it from the Tools & Firmware page on the Nutanix support portal.
  • There is no Foundation upgrade path to the new Controller VM implementation; you must download the Java aplet from the Foundation 3.0 download page on the support portal. However, you can upgrade Foundation 2.1.x to 3.0 for the bare metal workflow as follows:
      • Copy the Foundation tarball (foundation-version#.tar.gz) from the support portal to /home/nutanix in your VM.
      • Navigate to /home/nutanix.
      • Enter the following five commands:
        • $ sudo service foundation_service stop
        • $ rm -rf foundation
        • $ tar xzf foundation-version#.tar.gz
        • $ sudo yum install python-scp
        • $ sudo service foundation_service restart
    • If the first command (foundation_service stop) is skipped or the commands are not run in order, the user may get bizarre errors after upgrading. To fix this situation, enter the following two commands:
  • $ sudo pkill -9 foundation
  • $ sudo service foundation_service restart

Release Notes for each of these products is located at:

  • Acropolis base software 4.5:  https://portal.nutanix.com/#/page/docs/details?targetId=Release_Notes-Acr_v4_5:rel_Release_Notes-Acr_v4_5.html
  • Prism Central 4.5: https://portal.nutanix.com/#/page/docs/details?targetId=Release_Notes-Acr_v4_5:rel_Release_Notes-Prism_Central_v4_5.html
  • Nutanix Cluster Check(NCC) 2.1: https://portal.nutanix.com/#/page/docs/details?targetId=Release_Notes-NCC:rel_Release_Notes-NCC_v2_1.html
  • Foundation 3.0: https://portal.nutanix.com/#/page/docs/details?targetId=Field_Installation_Guide-v3_0:fie_release_notes_foundation_v3_0_r.html

Download URLs:

Until next time, Rob…

Nutanix SCVMM Fast Clones Plug-in

Hi Everyone…I love to show off the cool Microsoft integrations that Nutanix has and most recently Nutanix released System Center Virtual Machine Manager (SCVMM) 2012 R2 Fast Clones plug-in.

With NOS 4.1.3, Nutanix has released a Fast Clone plugin for SCVMM.  The plug-in has the ability to provide space efficient, low impact clones from SCVMM and quickly. The plugin is a wrapper around Nutanix powershell commands for Fast Cones. The plugin does need proper access rights to the Hyper-V hosts and SCVMM and already should be setup for most environments that have Nutanix with Hyper-V deployed.  You will need to install the plugin on the SCVMM host along with the Nutanix powershell command-lets.

Once you have the SCVMM Fast Clones plug-in installed, you can start creating Fast Clones right away. Installation is quick and easy and creating clones is just as easy as shown below.

To create VM clones using the Nutanix Fast Clones wizard, follow the below steps:

  1. Start the SCVMM
  2. Navigate to the Nutanix hosts.
  3. Select a host and then select the VM to be cloned.
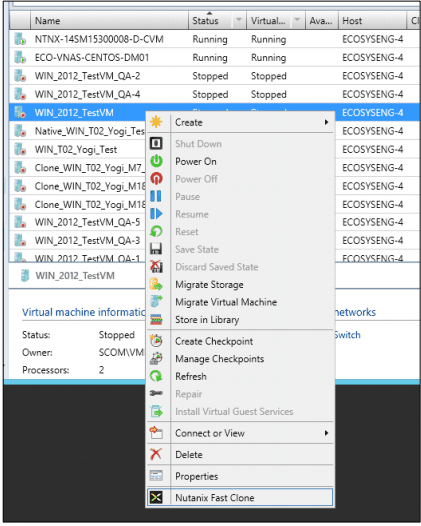
  4. To invoke the wizard, do one of the following: Click the “Nutanix Fast Clone” button on the top menu-bar. Right-click the target VM and select “Nutanix Fast Clone” from the pop-up context menu:
    fastclones2 Fast Clones
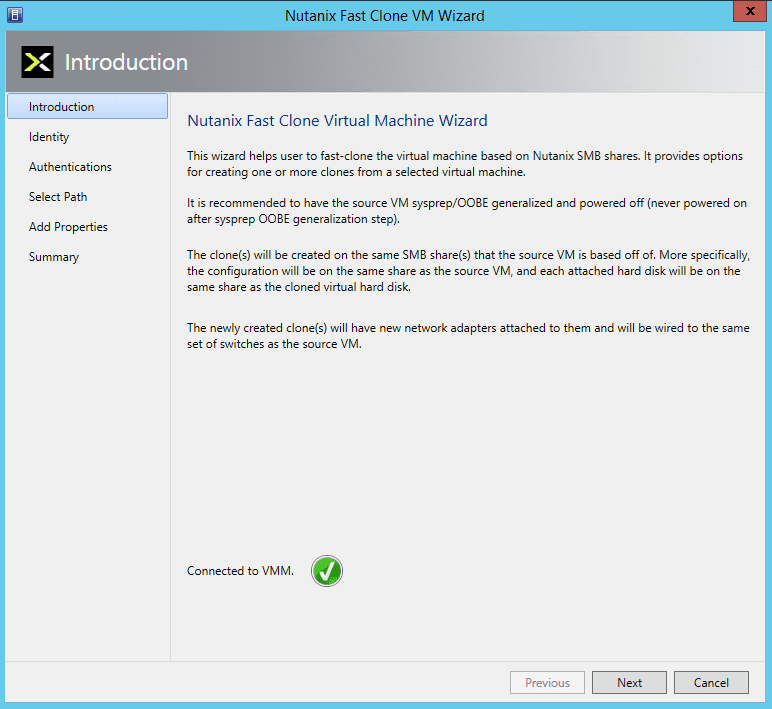
  5. In the Introduction screen, read the instructions and then click the “Next” button.  NOTE: On start of the wizard, it makes a connection to the VMM to be able to communicate with it to run SCVMM PowerShell cmdlets to gather information about the selected VM.
    fastclones1 Fast Clones
  6. The “Identity” screen is displayed. The “Source VM Name” and “Source VM Host Name” is prepopulated, enter the following information and then click the “Next” button:
    1. Clone Type: Click the “Clone One Virtual Machine” radio button and enter a name for the clone when creating a single clone or click the “Clone Multiple Virtual Machines” radio button and enter the following information:
      1. VM Prefix Name: This is the root part of the new VM name.
      2. Beginning Suffix: a number to start the numbering of the new VMs
      3. Number of Clones: a number between 1 and 100.
        fastclones3 Fast Clones
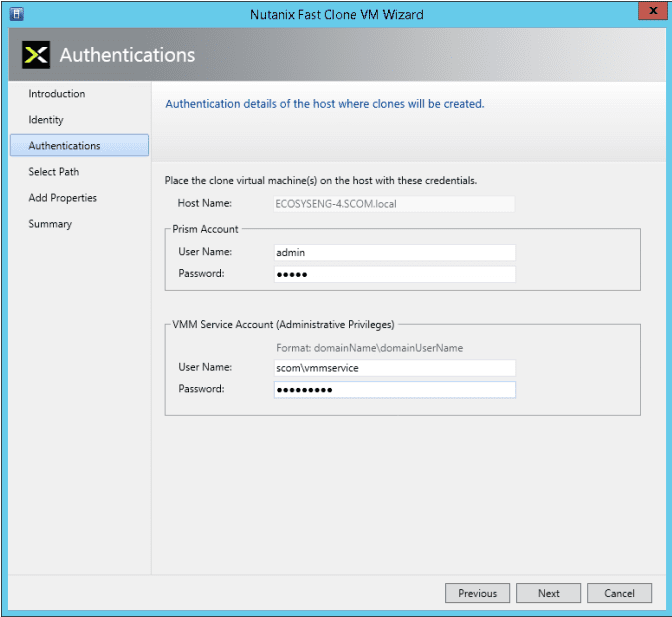
  7. In the Authentication screen, enter the Prism and VMM Service Account user names and passwords in the appropriate fields, and then click the “Next” button.
    fastclones4 Fast Clones
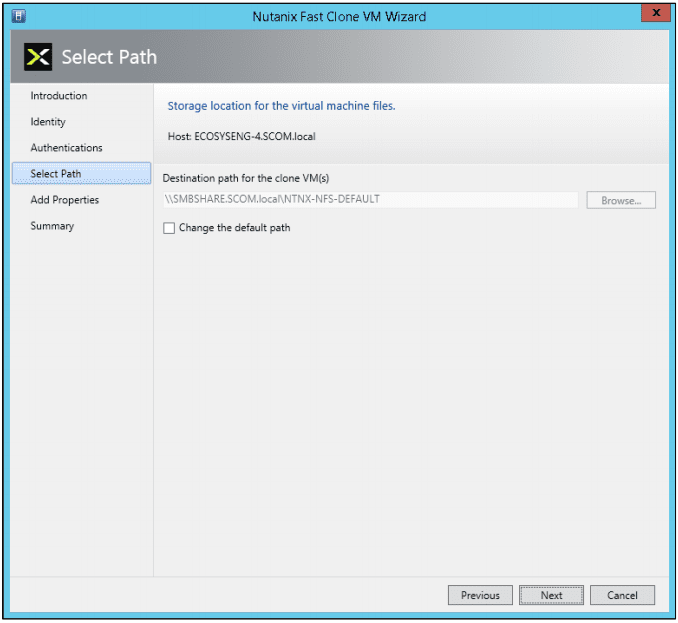
  8. In the “Select Path” screen, select the destination path and then click the “Next” button. Leave the default path “as is” or change it to a new path as needed by clicking the “Change the default path” box. Click the Browse button to select a destination path for the clone VMs. This is the path where virtual machine configuration files will be stored. The path must be on the same Nutanix SMB share as the VM configuration file.
    fastclones5 Fast Clones
  9. In the “Add Properties” screen, click the appropriate radio button to either power on or not power on the VMs after cloning and then click the “Next” button.
    fastclones6 Fast Clones
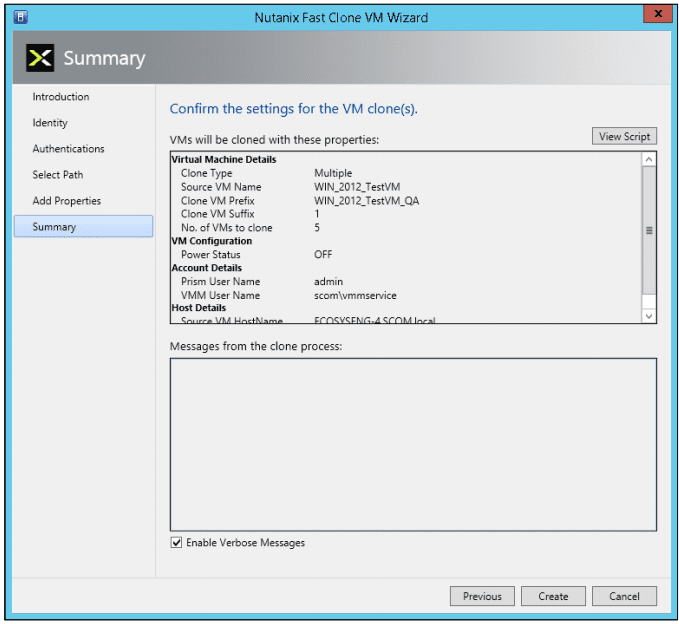
  10. In the Summary screen below, review (confirm) the settings are correct.
    fastclones7 Fast Clones
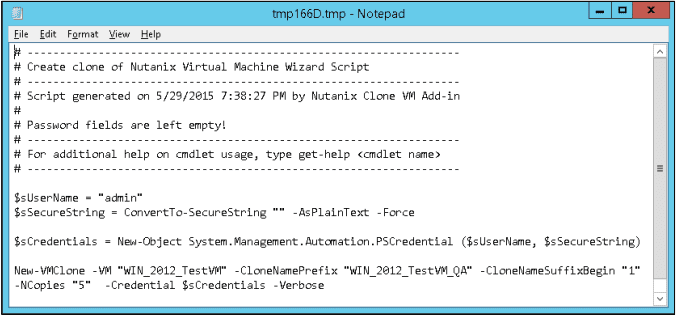
    Clicking the “View Script” button displays the script to be executed:
    fastclones9 Fast Clones
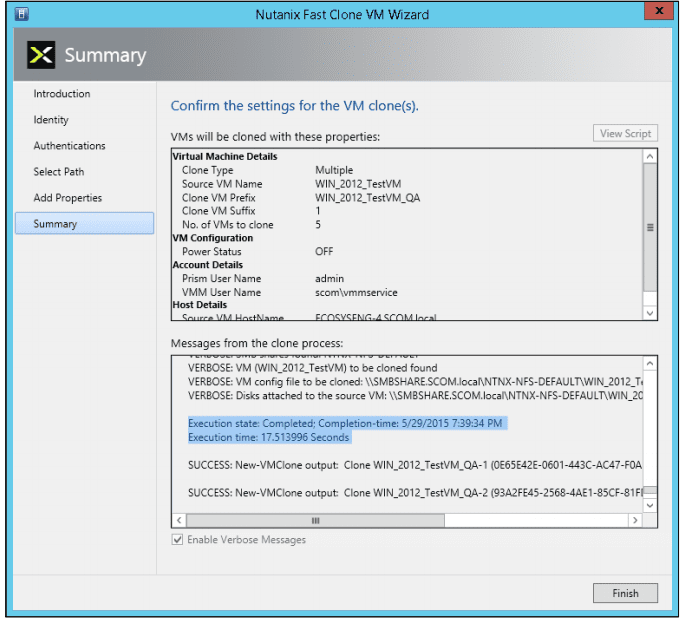
    Clicking the “Enable Verbose Messages” displays detailed log messages as the VMs are being created.
  11. When the settings are correct, click the “Create” button to create the cloned VM(s). An hour glass is displayed and progress messages are displayed.
  12. After the clones are created, click the Finish button to close the wizard and you just created VM’s at lighting speed.fastclones10 Fast Clones

If you want to check out Fast Clones for your environment, you can download Fast Clones from the Nutanix Portal at https://portal.nutanix.com.

Below is a demo video shows traditional cloning vs Fast Clones that my buddy @mcghem created.  It shows the awesome benefit of Fast Clones.

As always, if you have any questions please post a comment.

Until next time….Rob

Nutanix SCOM Management Pack – Monitor Your Nutanix Infrastructure

As a Microsoft Evangelist at Nutanix, I am always asked….”How would you monitor your Nutanix Infrastructure and can I use System Center suite. And my answer always is, “YES, with SCOM”….What is SCOM you ask?
SysCnt-OprtnsMgr_h_rgb_2 Nutanix SCOM Management Pack System Center Operations Manager (SCOM) is designed to be a monitoring tool for the datacenter. Think of a datacenter with multiple vendors representing multiple software and hardware products. Consequently, SCOM was developed to be extensible using the concept of management packs. Vendors typically develop one or more management packs for every product they want plugged into SCOM.

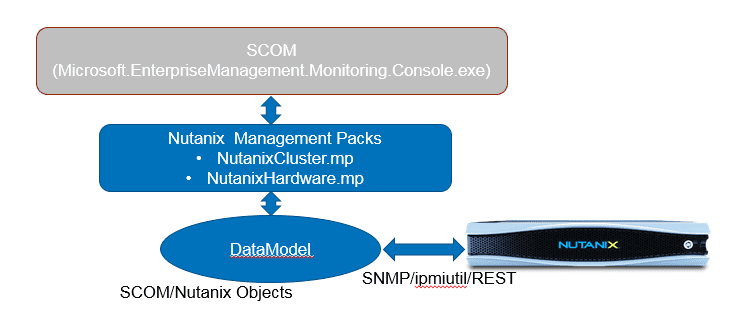
To facilitate these management packs, SCOM supports standard discovery and data collection mechanisms like SNMP, but also affords vendors the flexibility of native API driven data collection.  Nutanix provides management packs that support using the Microsoft System Center Operations Manager (SCOM) to monitor a Nutanix cluster.

Nutanix SCOM Management Pack

The management packs collect information about software (cluster) elements through SNMP and hardware elements through ipmiutil (Intelligent Platform Management Interface Utility) and REST API calls and then package that information for SCOM to digest. Note: The Hardware Elements Management Pack leverages the ipmiutil program to gather information from Nutanix block for Fans, Power Supply and Temperature.
SCOM01 Nutanix SCOM Management Pack

Nutanix provides two management packs:

  • Cluster Management Pack – This management pack collects information about software elements of a cluster including Controller VMs, storage pools, and containers.
  • Hardware Management Pack – This management pack collects information about hardware elements of a cluster including fans, power supplies, disks, and nodes.

Installing and configuring the management packs involves the following simple steps:

  1. Install and configure SCOM on the Windows server system (if not installed) (will blog a post soon on this topic)
  2. Uninstall existing Nutanix management packs (if present)
  3. Open the IPMI-related ports (if not open). IPMI access is required for the hardware management pack
  4. Install the Nutanix management packs
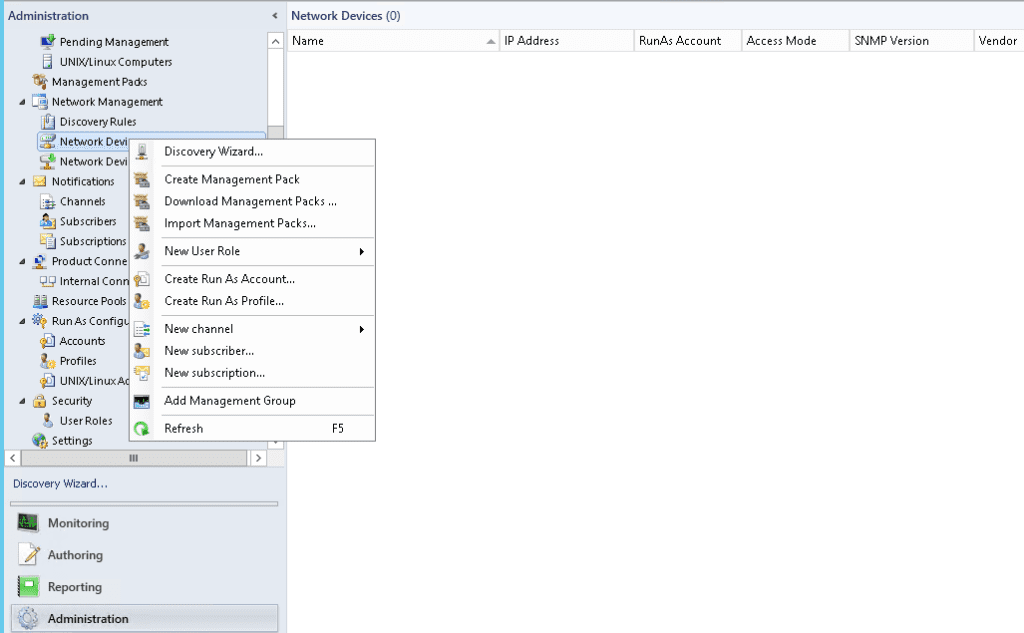
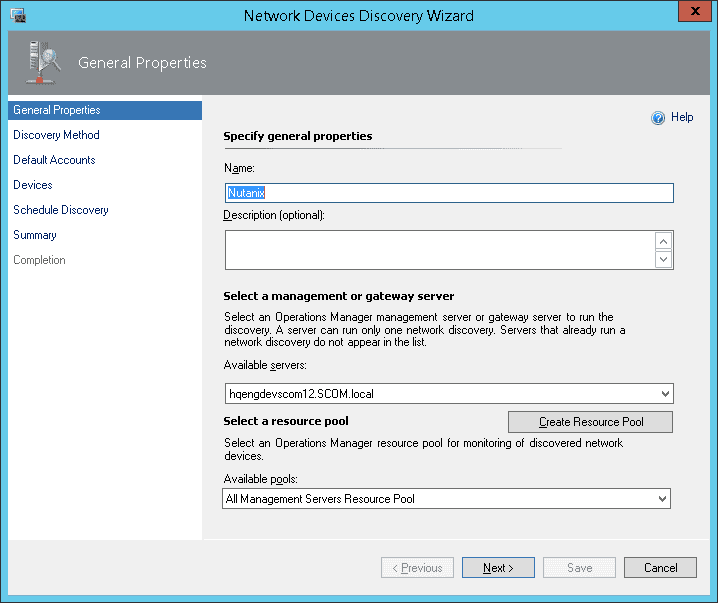
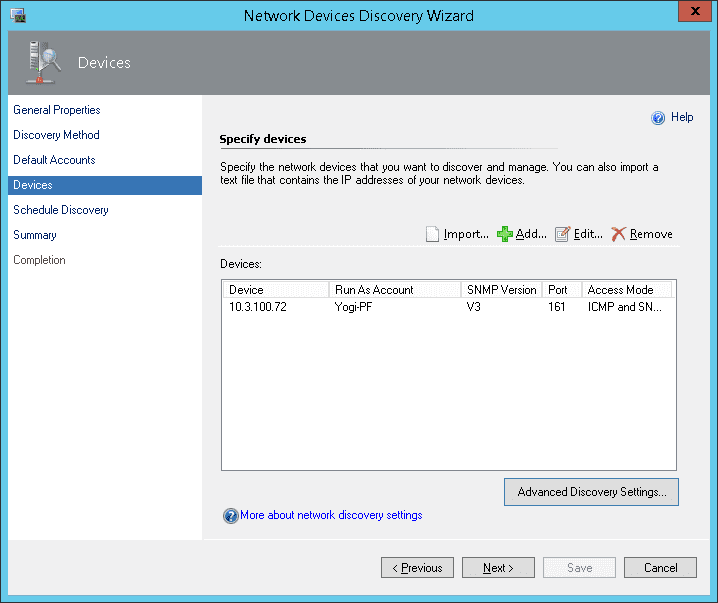
  5. Configure the management packs using the SCOM discovery and template wizards

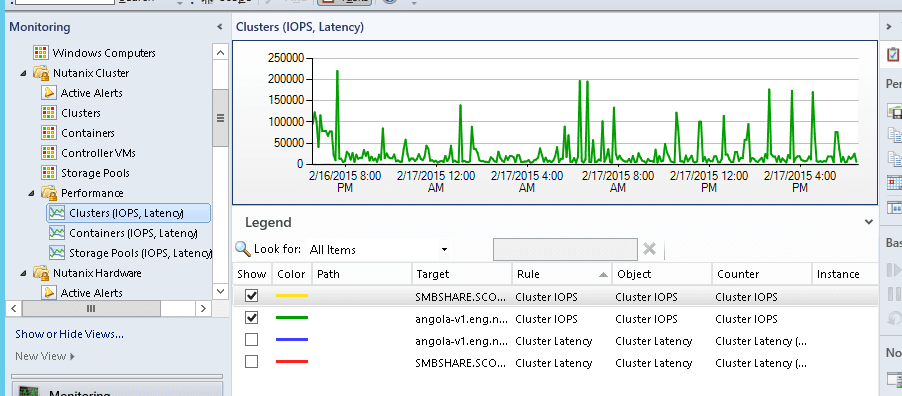
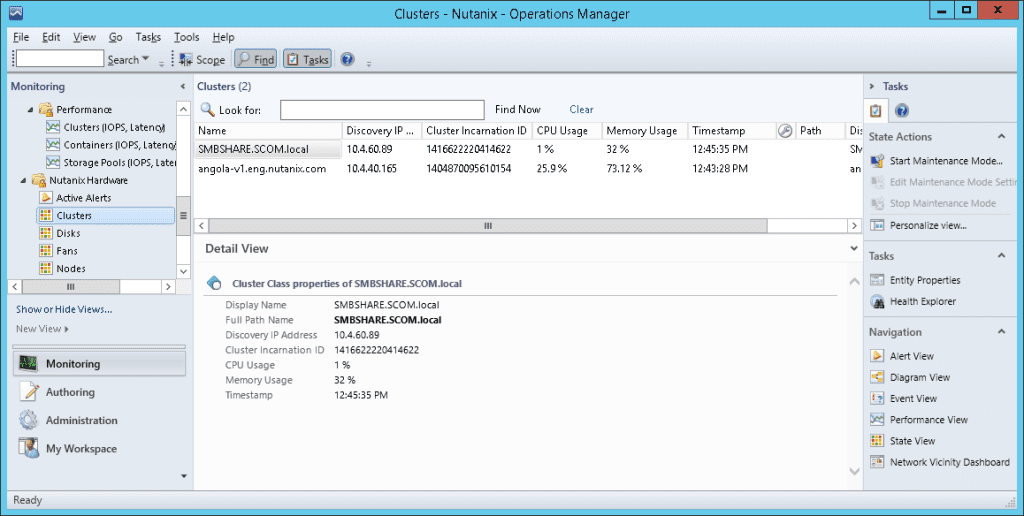
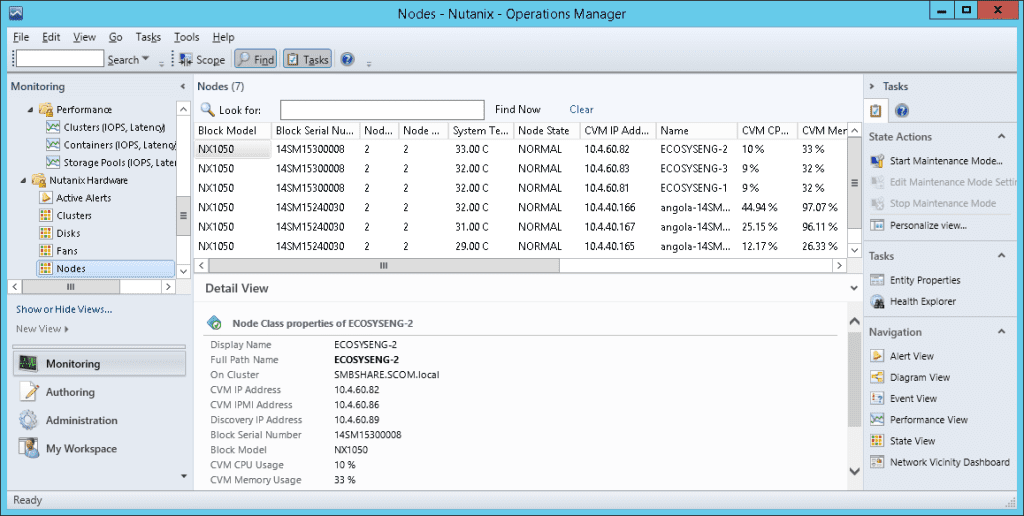
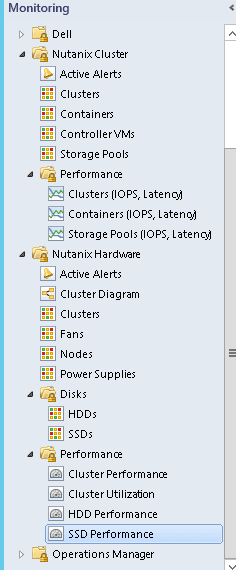
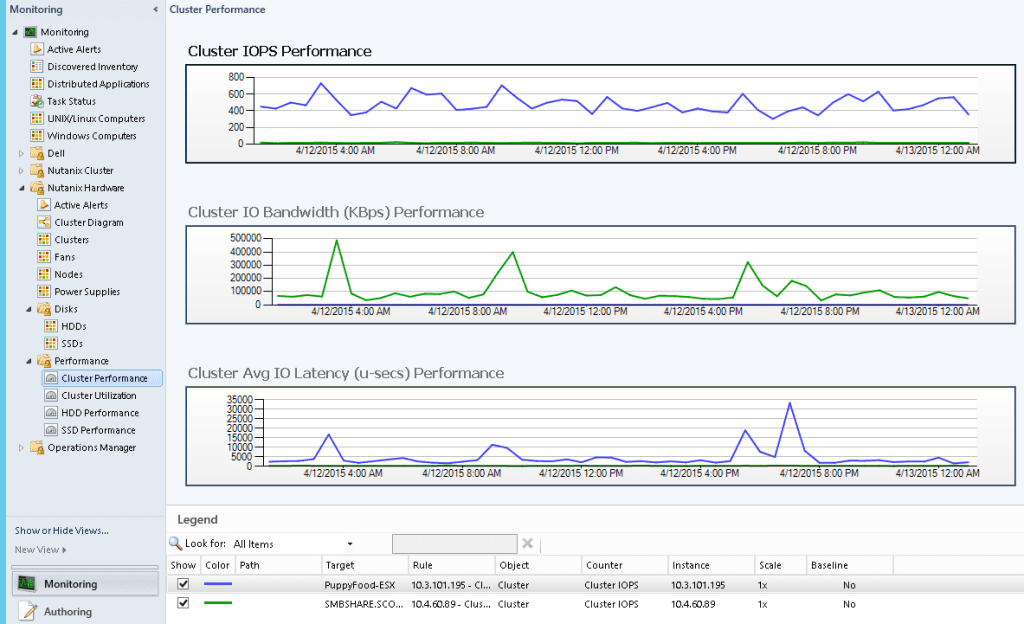
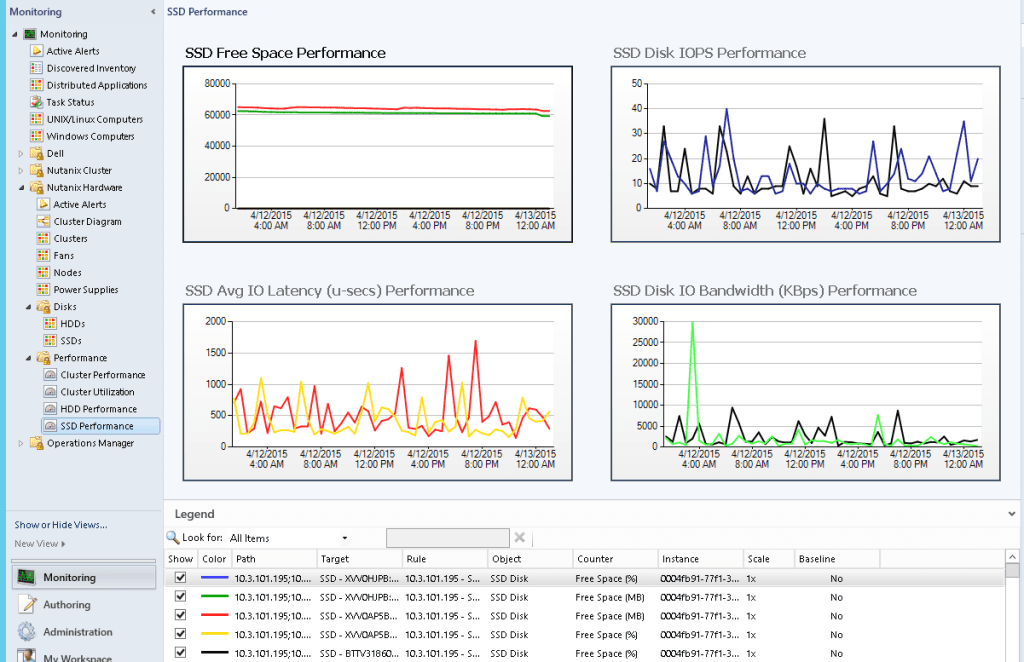
SCOM02 Nutanix SCOM Management Pack SCOM03 Nutanix SCOM Management Pack SCOM04 Nutanix SCOM Management PackSCOM16 Nutanix SCOM Management PackSCOM17 Nutanix SCOM Management PackSCOM18 Nutanix SCOM Management PackSCOM19 Nutanix SCOM Management PackAfter the management packs have been installed and configured, you can use SCOM to monitor a variety of Nutanix objects including cluster, alert, and performance views as shown in examples below. Also, I check out this great video produced by pal @mcghem . He shows a great demo of the SCOM management pack…Kudo’s Mike….also, check out his blog.

YouTube player

Views and Objects Snapshots SCOM05 Nutanix SCOM Management Pack

Cluster Monitoring SnapshotsSCOM06 Nutanix SCOM Management Pack SCOM07 Nutanix SCOM Management Pack

Cluster Performance Monitoring

SCOM08 Nutanix SCOM Management Pack SCOM09 Nutanix SCOM Management Pack SCOM10 Nutanix SCOM Management Pack SCOM11 Nutanix SCOM Management Pack

Hardware Monitoring Snapshots SCOM12 Nutanix SCOM Management Pack SCOM13 Nutanix SCOM Management Pack

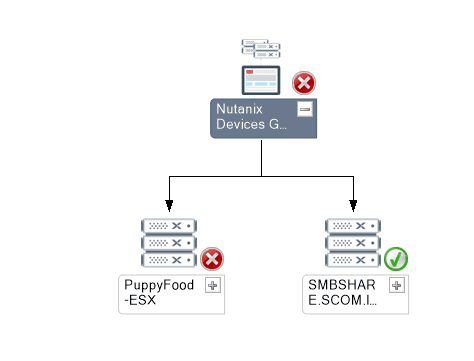
In the following diagram views, users can navigate to the components with failure.

SCOM14 Nutanix SCOM Management Pack

Nutanix Objects Available for Monitoring via SCOM

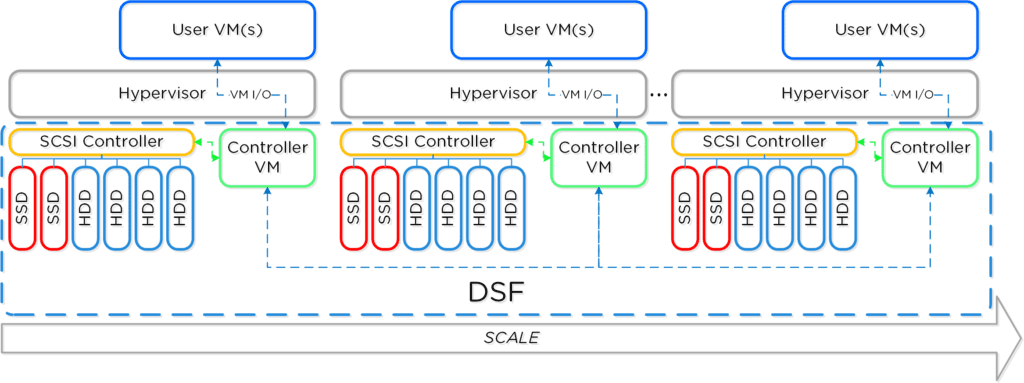
The following provides an high level overview of Nutanix Cluster with Components:

dsf_overview Nutanix SCOM Management Pack

The following sections describe Nutanix Cluster objects being monitored by this version of MPs:

Cluster

Monitored Element

Description

Version

Current cluster version. This is the nutanix-core package version expected on all the Controller VMs.

Status

Current Status of the cluster. This will usually be  one of started or stopped

TotalStorageCapacity

Total storage capacity of the cluster

UsedStorageCapacity

Number of bytes of storage used on the cluster

Iops

For Performance: Cluster wide average IO operations per second

Latency

For Performance: Cluster wide average latency

CVM Resource Monitoring

Monitored Element

Description

ControllerVMId

Nutanix Controller VM Id

Memory

Total memory assigned to CVM

NumCpus

Total number of CPUs allocated to a CVM

Storage

Storage Pool

A storage pool is a group of physical disks from SSD and/or HDD tier.

Monitored Element

Description

PoolId

Storage pool id

PoolName

Name of the storage pool

TotalCapacity

Total capacity of the storage pool

Note: An alert if there is drop in capacity may indicate a bad disk.

UsedCapacity

Number of bytes used in the storage pool

Performance parameters:

Monitored Element

Description

IOPerSecond

Number of IO operations served per second from this storage pool.

AvgLatencyUsecs

Average IO latency for this storage pool in microseconds

Containers

A container is a subset of available storage within a storage pool. Containers hold the virtual disks (vDisks) used by virtual machines. Selecting a storage pool for a new container defines the physical disks where the vDisks will be stored.

Monitored Element

Description

ContainerId

Container id

ContainerName

Name of the container

TotalCapacity

Total capacity of the container

UsedCapacity

Number of bytes used in the container

Performance parameters:

Monitored Element

Description

IOPerSecond

Number of IO operations served per second from this container.

AvgLatencyUsecs

Average IO latency for this container in  microseconds

Hardware Objects

Cluster

Monitored Element

Description

Discovery IP Address

IP address used for discovery of cluster

Cluster Incarnation ID

Unique ID of cluster

CPU Usage

CPU usage for all the nodes of cluster

Memory Usage

Memory usage for all the nodes of cluster

Node IP address

External IP address of Node

System Temperature

System Temperature

Disk

Monitored Element

Description

Disk State/health

Node state as returned by the PRISM [REST /hosts “state” attribute ]

Disk ID

ID assigned to the disk

Disk Name

Name of the disk (Full path where meta data stored)

Disk Serial Number

Serial number of disk

Hypervisor IP

Host OS IP where disk is installed

Tire Name

Disk Tire

CVM IP

Cluster VM IP which controls the disk

Total Capacity

Total Disk capacity

Used Capacity

Total Disk used

Online

If Disk is online or offline

Location

Disk location

Cluster Name

Disk cluster name

Discovery IP address

IP address through which Disk was discovered

Disk Status

Status of the disk

Node

Monitored Element

Description

Node State/health

Node state as returned by the PRISM [REST /hosts “state” attribute ]

Node IP address

External IP address of Node

IPMI Address

IPMI IP address of Node

Block Model

Hardware model of block

Block Serial Number

Serial number of block

CPU Usage %

 CPU usage for Node

Memory Usage  %

Memory usage for node

Fan Count

Total fans

Power Supply Count

Total Power supply

System Temperature

System Temperature

Fan

Monitored Element

Description

Fan number

Fan number

Fan speed

Fan speed in RPM

Power supply

 Element

Description

Power supply number

Power supply number

Power supply status

Power supply status whether present or absent

If you would like to checkout the Nutanix management pack on your SCOM instance, please go to our portal to download the management pack and documentation.
This management pack was development by our awesome engineering team @ Nutanix. Kudos to Yogi and team for a job well done!!! 😉  I hope I gave you a good feel for Nutanix monitoring using SCOM. As always, if you have any questions or comments, please leave below….

Until next time….Rob

Symon Perriman….his thoughts on Hyper-V, Security and future of Virtualization on the Nutanix .NEXT community podcast

Hey everyone…I wanted to share a very cool update (and maybe a little of hero-worship 😀 ).  Well, anyways, my job at Nutanix had another highlight recently.  As many of your know, I love reading, breathing, consuming Microsoft technology. During my consumption of education, there  number of people I follow, but there are few that stand out…and one that I spent a lot of time listening to via podcasts; Symon Perriman

Symon Perriman

Symon Perriman
He takes complex technology subjects and explains it extremely well on many levels so everyone understands..He believes in the community….all things as technologists, we can all strive to achieve.

I recently had the lucky chance to interview him for the Nutanix .Next Community Podcast.  It was great honor to interview him with my colleaguebuddy @NutanixTommy as we both had different points of views.

Symon joined 5nine Software earlier this year as Vice President, Business Development & Marketing and is how I came to meet Simon as part of my job in Technical Alliances at Nutanix.

For those of you who are not familiar with 5nine Software, 5nine has a great alternative management product for Hyper-V with benefits of simplified vCenter type management without the footprint of System Center. They also are the only vendor with agentless security product via the Hyper-V extensible virtual switch. Think vShield for Hyper-V…Very cool…   😎

For those that are not familiar with Symon…a brief history…
With more than 12 years of experience in the high-tech industry, Symon is an internationally recognized expert in virtualization, high-availability, disaster recovery, data center management, and cloud technologies.

As Microsoft’s Senior Technical Evangelist and worldwide technical lead covering virtualization, infrastructure, management and cloud. He has trained millions of IT Professionals, hosted the “Edge Show” weekly webcast, holds several patents and dozens of industry certifications, and in 2013 he co-authored “Introduction to System Center 2012 R2 for IT Professionals” (Microsoft Press). He graduated from Duke University with degrees in Computer Science, Economics and Film & Digital Studies.

Enjoy the show……

Until next time, Rob…

NPP Training series – Drive Breakdown

To continue NPP training series here is my next topic:  Drive Breakdown
If you missed other parts of my series, check out links below:
Part 1 – NPP Training series – Nutanix Terminology
Part 2 – NPP Training series – Nutanix Terminology
Cluster Architecture with Hyper-V

Data Structure on Nutanix with Hyper-V
I/O Path Overview

To give credit, most of the content was taken from Steve Poitras’s “Nutanix Bible” blog as his content is the most accurate and then I put a Hyper-V lean to it.

Drive Breakdown

In this section I’ll cover how the various storage devices (SSD / HDD) are broken down, partitioned and utilized by the Nutanix platform. NOTE: All of the capacities used are in Base2 Gibibyte (GiB) instead of the Base10 Gigabyte (GB).  Formatting of the drives with a filesystem and associated overheads has also been taken into account.

SSD Devices

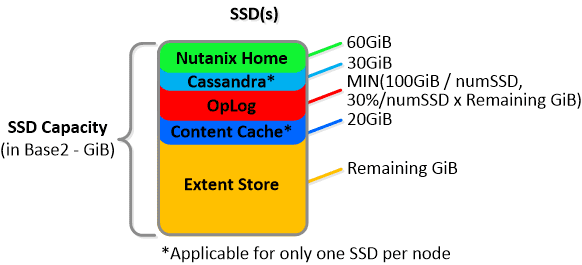
SSD devices store a few key items which are explained in greater detail above:

  • Nutanix Home (CVM core)
  • Cassandra (metadata storage) – MORE
  • OpLog (persistent write buffer) – MORE
  • Extent Store (persistent storage) – MORE

Below we show an example of the storage breakdown for a Nutanix node’s SSD(s):
NDFS_SSD_breakdown3 Drive Breakdown
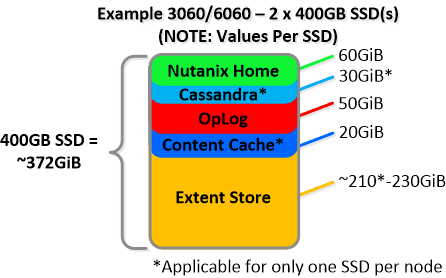
NOTE: The sizing for OpLog is done dynamically as of release 4.0.1 which will allow the extent store portion to grow dynamically.  The values used are assuming a completely utilized OpLog.  Graphics and proportions aren’t drawn to scale.  When evaluating the Remaining GiB capacities do so from the top down.  For example the Remaining GiB to be used for the OpLog calculation would be after Nutanix Home and Cassandra have been subtracted from the formatted SSD capacity. Most models ship with 1 or 2 SSDs, however the same construct applies for models shipping with more SSD devices. For example, if we apply this to an example 3060 or 6060 node which has 2 x 400GB SSDs this would give us 100GiB of OpLog, 40GiB of Content Cache and ~440GiB of Extent Store SSD capacity per node.  Storage for Cassandra is a minimum reservation and may be larger depending on the quantity of data.
NDFS_SSD_3060_2 Drive Breakdown
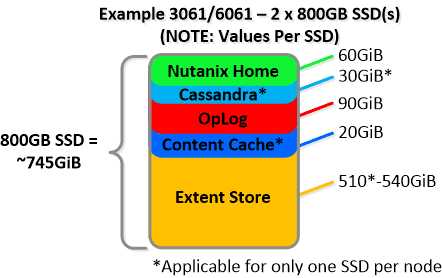
For a 3061 node which has 2 x 800GB SSDs this would give us 100GiB of OpLog, 40GiB of Content Cache and ~1.1TiB of Extent Store SSD capacity per node.
NDFS_SSD_3061v2 Drive Breakdown

HDD Devices

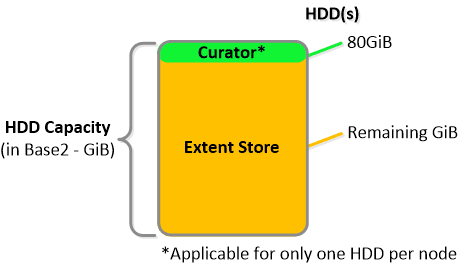
Since HDD devices are primarily used for bulk storage, their breakdown is much simpler:

  • Curator Reservation (Curator storage) – MORE
  • Extent Store (persistent storage)

NDFS_HDD_breakdown Drive Breakdown
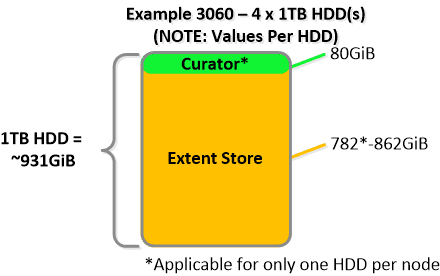
For example, if we apply this to an example 3060 node which has 4 x 1TB HDDs this would give us 80GiB reserved for Curator and ~3.4TiB of Extent Store HDD capacity per node.
NDFS_HDD_3060 Drive Breakdown
NOTE: the above values are accurate as of 4.0.1 and may vary by release.
Next up, I figured we would look at some of the cool software technologies that run on our CVM (Controller Virtual Machine), next up Elastic Dedupe Engine.

Until next time, Rob