For more information, check out my blog post on Windows Admin Center: Strengths, Weaknesses, Enterprise Readiness and Everything Else You Need to Know or go to the Windows Admin Center site for details on how to get started.
Until next time, Rob

For more information, check out my blog post on Windows Admin Center: Strengths, Weaknesses, Enterprise Readiness and Everything Else You Need to Know or go to the Windows Admin Center site for details on how to get started.
Until next time, Rob
Today, I am excited to announce I will be joining the awesome team at 5nine Software as Director of Product Management. My primary job responsibilities will be for the product strategy and direction of 5nine’s security and management solutions.
 So, you ask, why Product Management? It’s been a lifelong dream to be part of shaping the direction of a technology solution. By joining 5nine, I hope to simplify IT, Cloud and beyond, because there’s always a better way 🙂
“What prepared me for this was very surprising looking back.”
In the past few months, I have been focusing a lot of my time around the development of our Nutanix Ready Integrated Program which deals with partner solutions leveragingcosuming our API (application programming interfaces). After a lot of research on API programs and consumption patterns, I thought I would share my thoughts and some conclusions on the business side. Not sure if this is considered a blog post or just ramblings, but here we go.
Hi All, its Rob again and I decided to write a series on Azure Cloud. Since Azure Stack is months away from GA, its good to understand Azure Cloud for a few reasons. The API is the consistent across Azure Cloud and Azure Stack. And building a hybrid environment is the future for IT to use features like DR, Application Portability and Backup.

Happy New Year Everyone!!! I know Azure Stack is just around the corner, but I still get lots of questions around configuring WAP and portals. So to follow-up my Windows Azure Pack (WAP) series, I am going to talk about reconfiguring server names and ports as well as assigning trusted certificates to my WAP Portals.
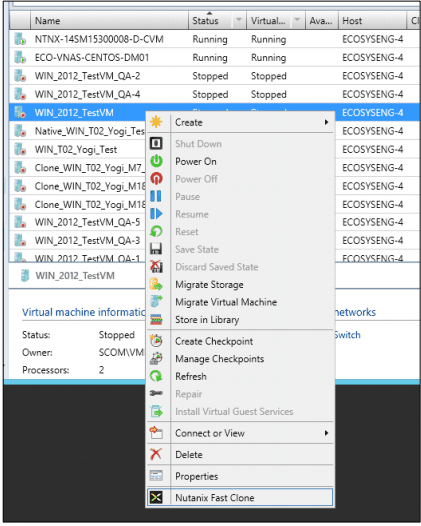
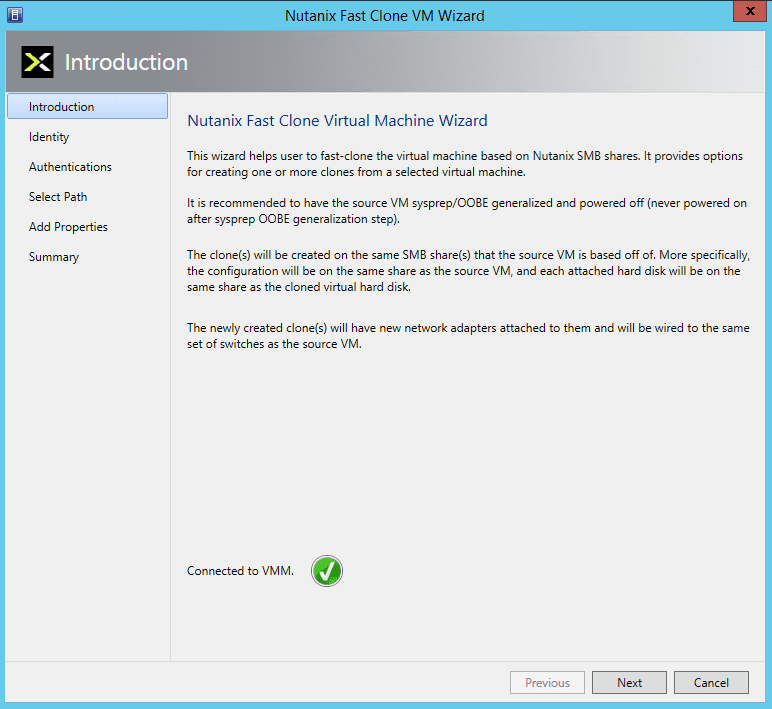
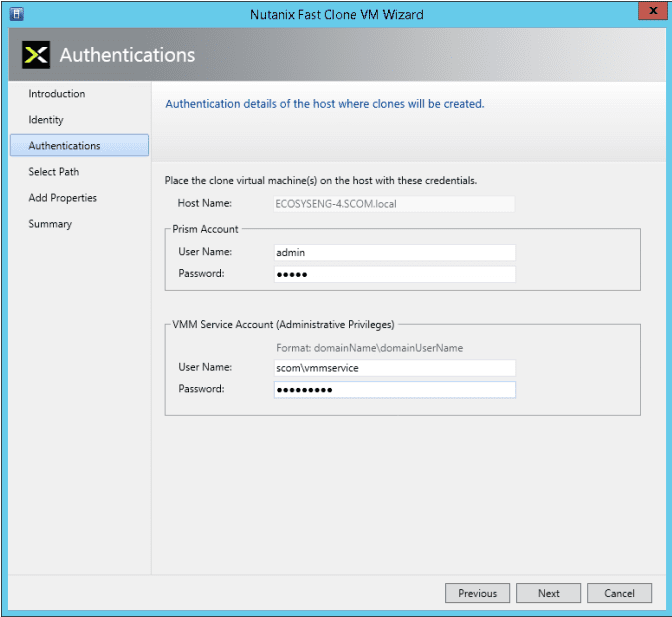
Hi Everyone…I love to show off the cool Microsoft integrations that Nutanix has and most recently Nutanix released System Center Virtual Machine Manager (SCVMM) 2012 R2 Fast Clones plug-in.
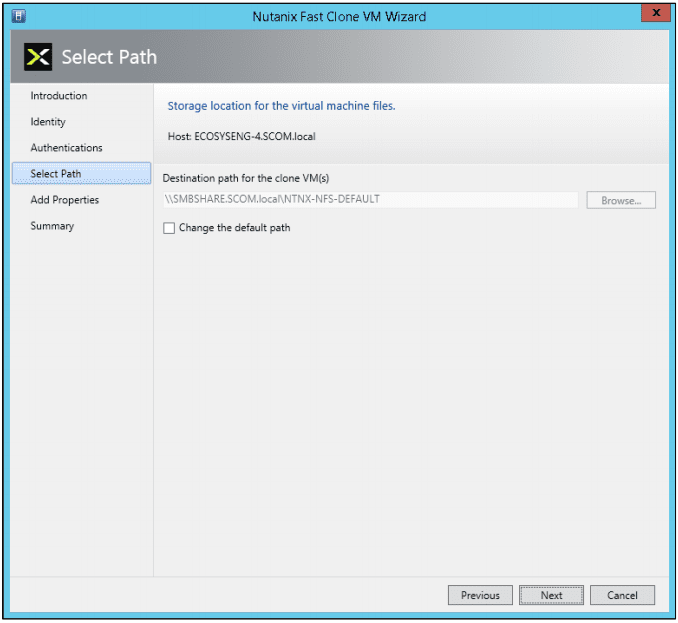
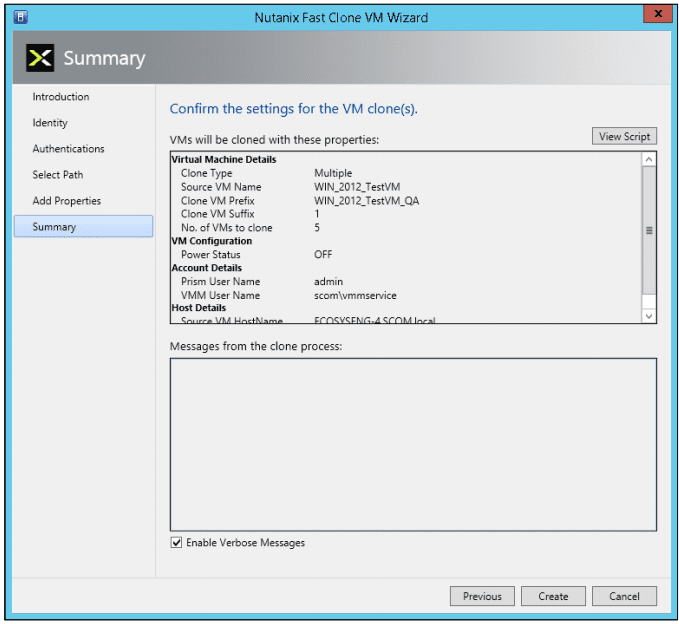
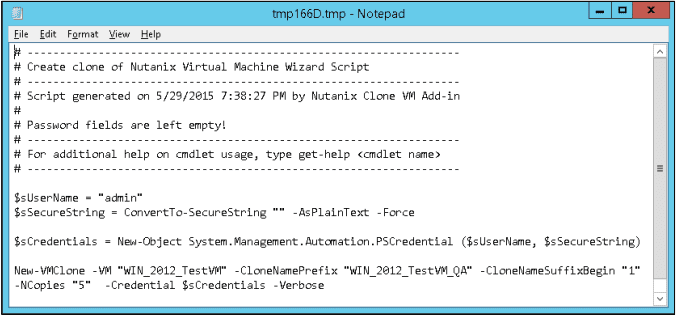
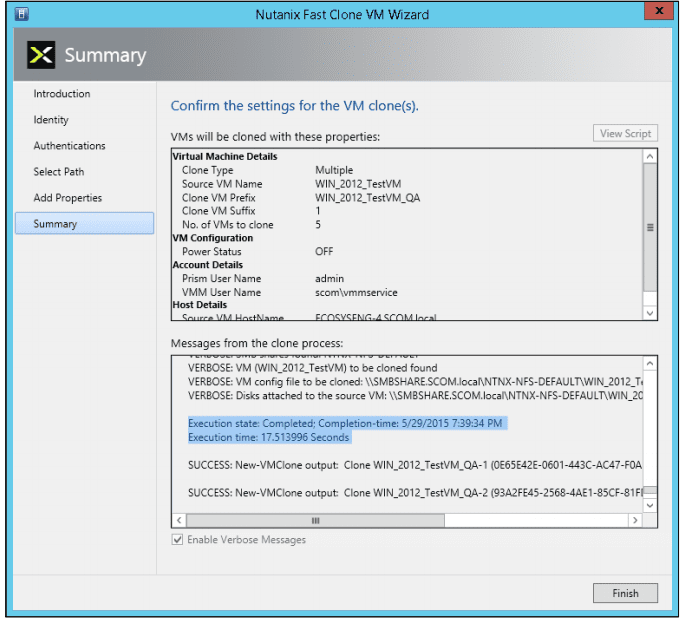
With NOS 4.1.3, Nutanix has released a Fast Clone plugin for SCVMM. The plug-in has the ability to provide space efficient, low impact clones from SCVMM and quickly. The plugin is a wrapper around Nutanix powershell commands for Fast Cones. The plugin does need proper access rights to the Hyper-V hosts and SCVMM and already should be setup for most environments that have Nutanix with Hyper-V deployed. You will need to install the plugin on the SCVMM host along with the Nutanix powershell command-lets.
Once you have the SCVMM Fast Clones plug-in installed, you can start creating Fast Clones right away. Installation is quick and easy and creating clones is just as easy as shown below.


If you want to check out Fast Clones for your environment, you can download Fast Clones from the Nutanix Portal at https://portal.nutanix.com.
Below is a demo video shows traditional cloning vs Fast Clones that my buddy @mcghem created. It shows the awesome benefit of Fast Clones.
As always, if you have any questions please post a comment.
Until next time….Rob
As a Microsoft Evangelist at Nutanix, I am always asked….”How would you monitor your Nutanix Infrastructure and can I use System Center suite. And my answer always is, “YES, with SCOM”….What is SCOM you ask?

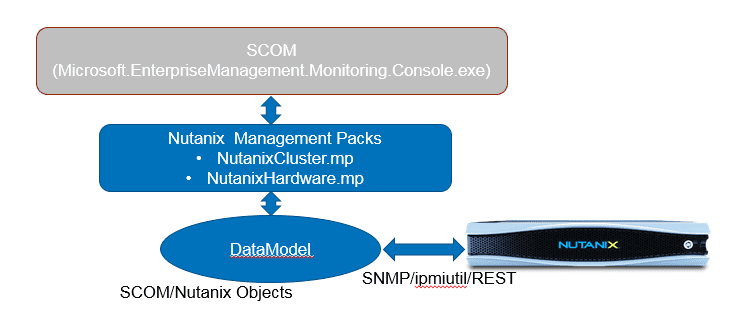
 System Center Operations Manager (SCOM) is designed to be a monitoring tool for the datacenter. Think of a datacenter with multiple vendors representing multiple software and hardware products. Consequently, SCOM was developed to be extensible using the concept of management packs. Vendors typically develop one or more management packs for every product they want plugged into SCOM.
To facilitate these management packs, SCOM supports standard discovery and data collection mechanisms like SNMP, but also affords vendors the flexibility of native API driven data collection. Nutanix provides management packs that support using the Microsoft System Center Operations Manager (SCOM) to monitor a Nutanix cluster.
The management packs collect information about software (cluster) elements through SNMP and hardware elements through ipmiutil (Intelligent Platform Management Interface Utility) and REST API calls and then package that information for SCOM to digest. Note: The Hardware Elements Management Pack leverages the ipmiutil program to gather information from Nutanix block for Fans, Power Supply and Temperature.


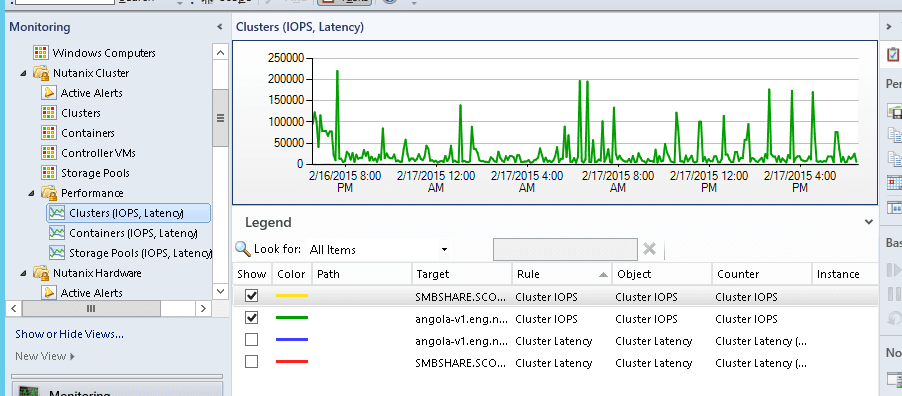
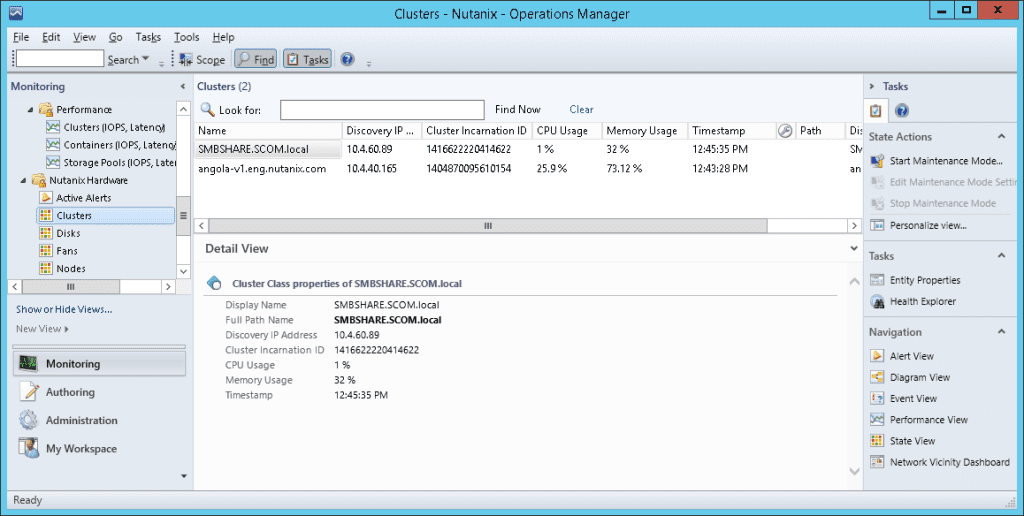
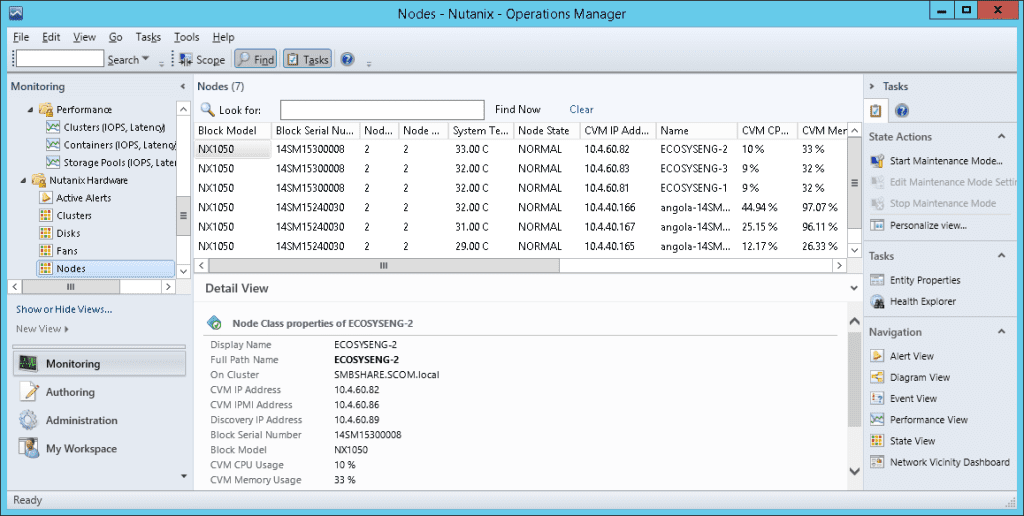
 After the management packs have been installed and configured, you can use SCOM to monitor a variety of Nutanix objects including cluster, alert, and performance views as shown in examples below. Also, I check out this great video produced by pal @mcghem . He shows a great demo of the SCOM management pack…Kudo’s Mike….also, check out his blog.

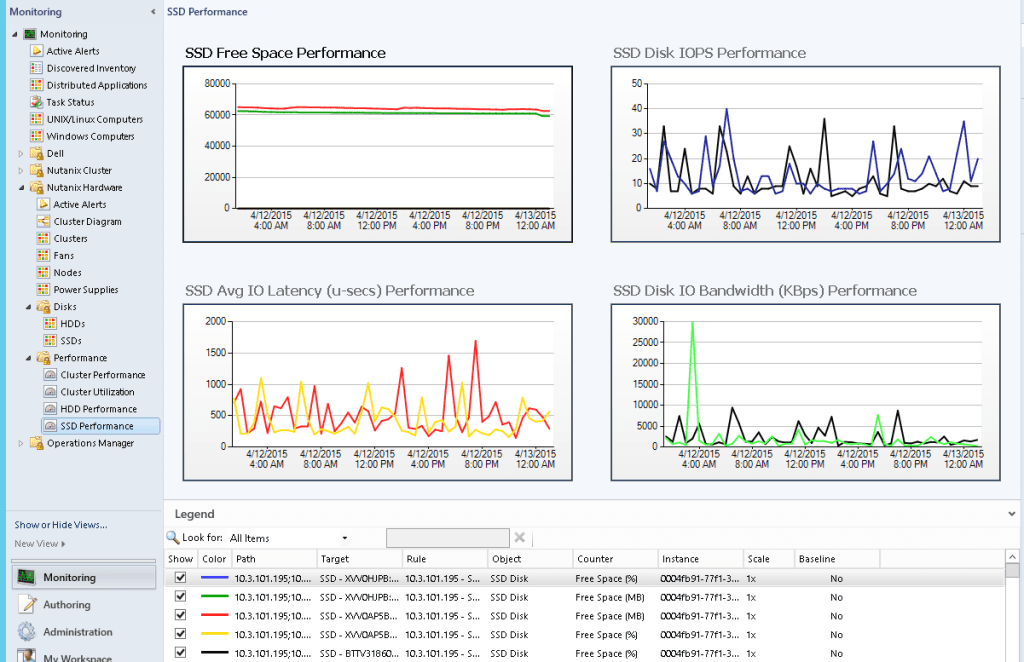
Views and Objects Snapshots 
Cluster Monitoring Snapshots

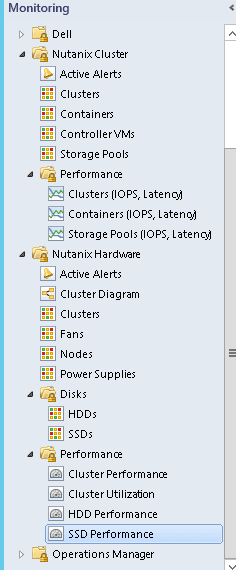

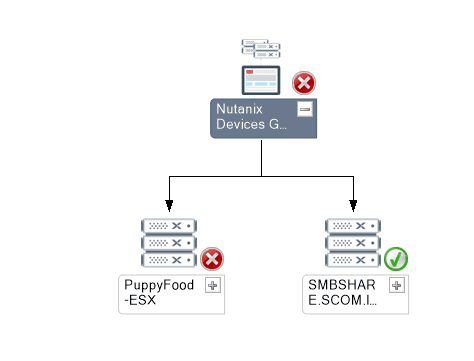
In the following diagram views, users can navigate to the components with failure.
The following provides an high level overview of Nutanix Cluster with Components:

The following sections describe Nutanix Cluster objects being monitored by this version of MPs:
Monitored Element | Description |
Version | Current cluster version. This is the nutanix-core package version expected on all the Controller VMs. |
Status | Current Status of the cluster. This will usually be one of started or stopped |
TotalStorageCapacity | Total storage capacity of the cluster |
UsedStorageCapacity | Number of bytes of storage used on the cluster |
Iops | For Performance: Cluster wide average IO operations per second |
Latency | For Performance: Cluster wide average latency |
Monitored Element | Description |
ControllerVMId | Nutanix Controller VM Id |
Memory | Total memory assigned to CVM |
NumCpus | Total number of CPUs allocated to a CVM |
A storage pool is a group of physical disks from SSD and/or HDD tier.
Monitored Element | Description |
PoolId | Storage pool id |
PoolName | Name of the storage pool |
TotalCapacity | Total capacity of the storage pool Note: An alert if there is drop in capacity may indicate a bad disk. |
UsedCapacity | Number of bytes used in the storage pool |
Monitored Element | Description |
IOPerSecond | Number of IO operations served per second from this storage pool. |
AvgLatencyUsecs | Average IO latency for this storage pool in microseconds |
A container is a subset of available storage within a storage pool. Containers hold the virtual disks (vDisks) used by virtual machines. Selecting a storage pool for a new container defines the physical disks where the vDisks will be stored.
Monitored Element | Description |
ContainerId | Container id |
ContainerName | Name of the container |
TotalCapacity | Total capacity of the container |
UsedCapacity | Number of bytes used in the container |
Monitored Element | Description |
IOPerSecond | Number of IO operations served per second from this container. |
AvgLatencyUsecs | Average IO latency for this container in microseconds |
Monitored Element | Description |
Discovery IP Address | IP address used for discovery of cluster |
Cluster Incarnation ID | Unique ID of cluster |
CPU Usage | CPU usage for all the nodes of cluster |
Memory Usage | Memory usage for all the nodes of cluster |
Node IP address | External IP address of Node |
System Temperature | System Temperature |
Monitored Element | Description |
Disk State/health | Node state as returned by the PRISM [REST /hosts “state” attribute ] |
Disk ID | ID assigned to the disk |
Disk Name | Name of the disk (Full path where meta data stored) |
Disk Serial Number | Serial number of disk |
Hypervisor IP | Host OS IP where disk is installed |
Tire Name | Disk Tire |
CVM IP | Cluster VM IP which controls the disk |
Total Capacity | Total Disk capacity |
Used Capacity | Total Disk used |
Online | If Disk is online or offline |
Location | Disk location |
Cluster Name | Disk cluster name |
Discovery IP address | IP address through which Disk was discovered |
Disk Status | Status of the disk |
Monitored Element | Description |
Node State/health | Node state as returned by the PRISM [REST /hosts “state” attribute ] |
Node IP address | External IP address of Node |
IPMI Address | IPMI IP address of Node |
Block Model | Hardware model of block |
Block Serial Number | Serial number of block |
CPU Usage % | CPU usage for Node |
Memory Usage % | Memory usage for node |
Fan Count | Total fans |
Power Supply Count | Total Power supply |
System Temperature | System Temperature |
Monitored Element | Description |
Fan number | Fan number |
Fan speed | Fan speed in RPM |
Element | Description |
Power supply number | Power supply number |
Power supply status | Power supply status whether present or absent |
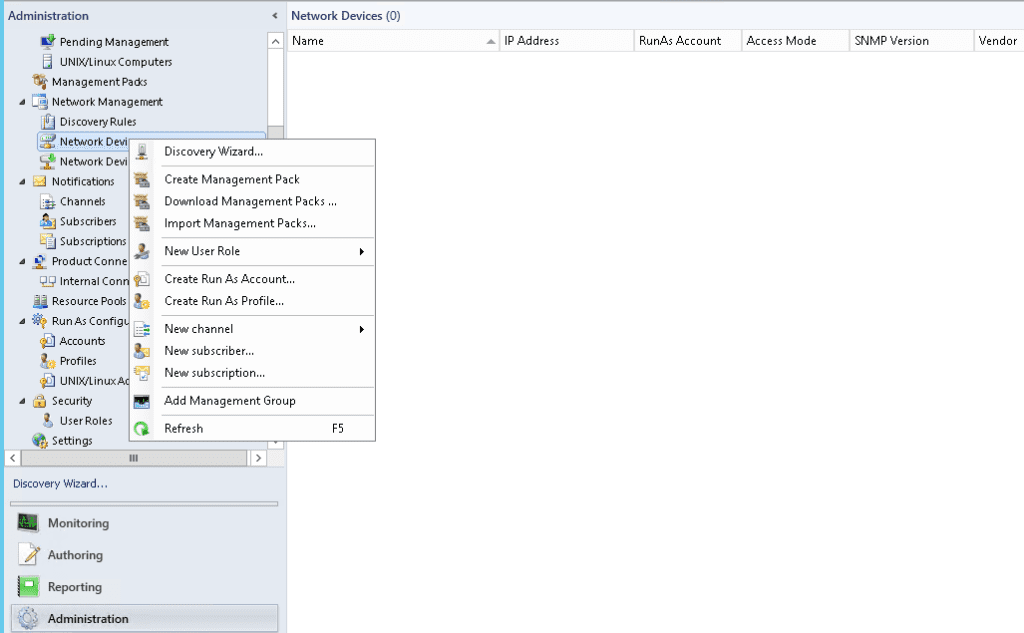
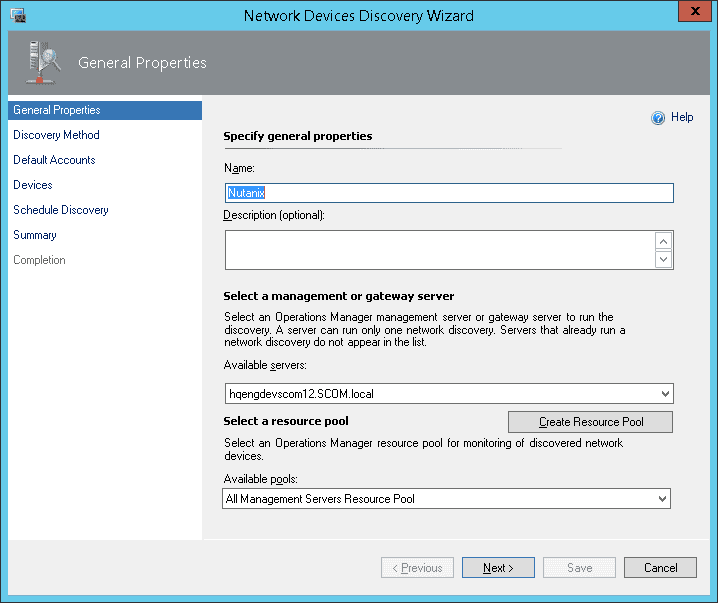
If you would like to checkout the Nutanix management pack on your SCOM instance, please go to our portal to download the management pack and documentation.
This management pack was development by our awesome engineering team @ Nutanix. Kudos to Yogi and team for a job well done!!! 😉 I hope I gave you a good feel for Nutanix monitoring using SCOM. As always, if you have any questions or comments, please leave below….
Until next time….Rob
To continue the Windows Azure Pack series, here is my next topic: Installing and Configuring Service Provider Foundation
If you missed other parts of the series, check links below:
Part 1 – Understanding Windows Azure Pack
Part 2 – Understanding Windows Azure Pack – Deployment Scenarios
Part 3 – Understanding Windows Azure Pack – How to guide with Express Edition on Nutanix – Environment Requirements
There are 2 main steps to deploying WAP (Windows Azure Pack) on Nutanix:
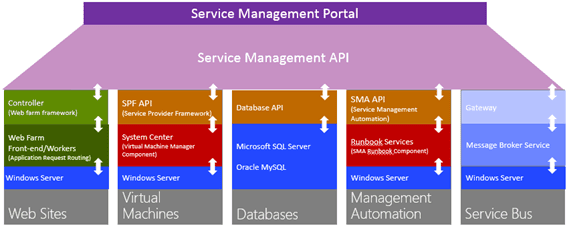
SPF is provided with System Center 2012 – Orchestrator, a component of System Center 2012 R2. SPF exposes an extensible OData web service that interacts with System Center Virtual Machine Manager (SCVMM). This enables service providers and hosters to design and implement multi-tenant self-service portals that integrate IaaS (Infrastructure as a Service) capabilities available on System Center 2012 R2. The following picture shows how System Center w/SPF interacts with WAP to provide VM Cloud Services (see TechNet article for more info):
 As with every installation, SPF requires additional software, features and server roles. Setup wizard checks prerequisites and reports about their status. Unfortunately, there is no “button” to install all of requirements automatically. I’ve wrote a script to automate this process (see below). Please note: Don’t try to install SPF on the SCVMM Server. It’s not supported.
Requirements:
This script will install all requirements except SCVMM console (please note that SCVMM console has to be installed manually):
#IIS + Process activation model
Install-WindowsFeature Web-Asp-Net45,Web-Scripting-Tools,Web-Basic-Auth,Web-Windows-Auth,NET-WCF-Services45,Web-ISAPI-Ext,Web-ISAPI-Filter,Web-Scripting-Tools,WAS-Process-Model,WAS-Config-APIs,ManagementOdata
#Download and install WcfDataServices and AspNetMVC4
New-Item C:SPFRequirements -ItemType Directory
Invoke-WebRequest http://download.microsoft.com/download/8/F/9/8F93DBBD-896B-4760-AC81-646F61363A6D/WcfDataServices.exe -OutFile C:SPFRequirementswcfdatasvc.exe
Invoke-WebRequest http://download.microsoft.com/download/2/F/6/2F63CCD8-9288-4CC8-B58C-81D109F8F5A3/AspNetMVC4Setup.exe -OutFile C:SPFRequirementsaspnetmvc.exe
Set-Location C:SPFRequirements
.aspnetmvc.exe /quiet
Wait-Process aspnetmvc
.wcfdatasvc.exe /quiet
Wait-Process wcfdatasvc
Write-Host “All prerequisites are installed. Insert your SCVMM 2012 R2 DVD and install SCVMM Console manually. Then your environment will be ready for SPF installation“
And the following domain group
This admin group should be added to the local Administrators group on the SPF server.
The Service Provider Foundation provides an extensible OData web service. Communications to this web service can and should be encrypted by SSL. SSL requires certificates. The Service Provider Foundation allows for self-singed certificates (for testing purposes) and certificates issued by a standalone Certificate Authority, an enterprise Certificate Authority or a public Certificate Authority. The Service Provider Foundation install defaults to self-signed (wizard creates one automatically) or you can obtain a certificate from a Public CA for production.
The Service Provider Foundation setup is on the System Center Orchestrator R2 media.
When installing, login to the SPF server as a user that has DBO/SA rights to the SQL 2012 instance that will be hosting SPF databases.


Define application pool credentials (spfadminsvc) and SPF_Admin Group that will have an access to SPF services and click Next. It’s best practices to create new domain accounts for every SPF services instead of using Network Service account.

Provider Web Service properties , click Next

Usage Web Service configuration, click Next

Windows updates + CEIP – yes (Microsoft needs your feedback 🙂 ), click Next

Click Install

Setup is complete!

Update SPF with the latest rollup (https://support.microsoft.com/en-us/kb/3021802) or use Windows Update.
Please note, the latest roll-up causing an issue in IIS and breaks SPF Web from working. I ran into this during my lab deployment. Check out this blog post on “System Center 2012 R2 : Update Rollup 4 breaks the SPF website” that fixes the issue.
This completes the SPF install. In a future blog post, we will be integrating SPF with WAP and SCVMM.
Additional links:
http://technet.microsoft.com/en-us/library/jj642895.aspx
http://technet.microsoft.com/en-us/library/dn266007.aspx
Next up in my series, Installing the Windows Azure Pack on Nutanix
Until next time, Rob….