
Estimated reading time: 13 minutes
 Thank you for reading this post, don't forget to subscribe! Happy New Year 2024!
To continue Windows Azure Pack series here is my next topic: Installing and Configuring Windows Azure Pack
If you missed other parts of the series, check links below:
Part 1 – Understanding Windows Azure Pack
Part 2 – Understanding Windows Azure Pack – Deployment Scenarios
Part 3 – Understanding Windows Azure Pack – How to guide with Express Edition on Nutanix – Environment Prep
Part 4 – Deploying Service Provider Framework on Nutanix
Again to reiterate from my previous blog posts and set some context, Windows Azure Pack (WAP) includes the following capabilities:
WAP:
- Management portal for tenants – a customizable self-service portal for provisioning, monitoring, and managing services such as Web Site Clouds, Virtual Machine Clouds, and Service Bus Clouds.
- Management portal for administrators – a portal for administrators to configure and manage resource clouds, user accounts, and tenant offers, quotas, and pricing.
- Authentication sites – these sites provide authentication services for the management portal for administrators and the management portal for tenants. Windows Authentication + ADFS for Admins Sites and ASP.NET provider for tenants
- Service management API – a REST API that helps enable a range of integration scenarios including custom portal and billing systems.
IaaS Resources:
- Web Site Clouds – a service that helps provide a high-density, scalable shared web hosting platform for ASP.NET, PHP, and Node.js web applications. The Web Site Clouds service includes a customizable web application gallery of open source web applications and integration with source control systems for custom-developed web sites and applications.
- Virtual Machine Clouds – a service that provides infrastructure-as-a-service (IaaS) capabilities for Windows and Linux virtual machines. The Virtual Machine Clouds service includes a VM template gallery, scaling options, and virtual networking capabilities.
- Service Bus Clouds – a service that provides reliable messaging services between distributed applications. The Service Bus Clouds service includes queued and topic-based publish/subscribe capabilities.
- SQL and MySQL – services that provide database instances. These databases can be used in conjunction with the Web Sites service.
- Automation – the capability to automate and integrate additional custom services into the services framework, including a runbook editor and execution environment.
- Optional resource = what you are going to connect with WAP (for example, SCVMM cloud, SQL Server, etc).
- Required components = Windows Azure Pack components which you install on one machine (express) or on multiple machines (distributed)
In other words, WAP is interface between your resources and tenants = clientscustomers. On the following diagram you can see the main components of WAP, cloud components and optional resources. WAP can be deployed in 2 different ways – express and distributed as previously discussed. In the express deployment, like we are deploying in this series, you can install all WAP components on one machine for labdemo purposes. If you want to have WAP in your production environment, you should always use distributed deployment as mentioned in previous posts in this series. In such a deployment, WAP required and optional components are installed on multiple machines.
Below are examples of various distributed deployments


In this blog post I will explain how to perform the following procedures;
- Installing Windows Azure Pack
- Configuring VMM and SPF
- Configuring Windows Azure Pack
- Login as a Tenant and provision a VM and SQL Database
Prerequisites
- System Center Virtual Machine Manager 2012 R2 (VMM01) is installed and configured:
- Member of the AD domain
- One or more SCVMM Clouds created in SCVMM (See video)
- One or more VM Networks created in SCVMM
- Service Provider Foundation is installed as shown in my previous blog post
- SPF IIS Web service running under a domain account
- SQL Server Instance is installed running SQL 2012 or later for Hosting WAP Client Databases (DB01)
- Member of the AD domain
- With SQL Authentication enabled (Using SA)
- WAP Server (WAP01)
Installing Windows Azure Pack:
- On the freshly build WAP Windows Server 2012 R2 server follow the prerequisites steps to install WAP
- Disable Internet Explorer Enhanced Security

- Install Microsoft Web Platform Installer (Web PI) 4.6 (it can be downloaded from here if the WAP server has no Internet follow this blog post)
- Install the following software through Web Pl, in this order:
- Enable Microsoft .NET Framework 3.5 SP 1 in Server Manager
- .NET 4.5 Extended, with ASP.NET for Windows 8.
- IIS recommended configuration.
- Launch WEB PI (Windows Platform Installer) Installer
- Select Products from the top menu
- Type: Windows Azure Pack in the search field in the left side
- Click Add Windows Azure Pack: Portal and API Express
 WAP Express installer in Web PI
 - Click Install at the bottom of the WEB PI windows
- Read the terms of use, Click I Accept
- When the Wizard completes the installation, it will present a screen as the one described in the picture below asking to Continue. When clicking the Continue button, an Internet Explorer Window will be launched

WAP Install screen in Web PI

WAP Install screen in Web PI - In the recently opened Internet Explorer page, copy the URL, and launch a new browser with administrative privileges. When the new browser is opened, paste the URL you obtained before (https://localhost:30101/)
- In the browser, if you are presented with warnings related to the certificate, click continue. and then the Windows Azure Pack Setup will be displayed
 WAP Install screen in Web PI
 - In the Database Server page, provide the following information:
Server Name: an instance that accepts SQL Authentication (for example db01.contoso.com)
Authentication type: SQL authentication (Windows Authentication can also be used).
Database server admin username: sa
Password: ********
Passphrase: ******** - Click on the arrow for next.
 Database Server setup in WAP install
 - In the Customer Experience Improvement program, select one Yes (MS needs your feedback:) ) and click Next
- In the Features Setup page, click on the to finish the wizard.
- Once the setup has completed, click in the arrow button

- Sign out and Sign in from WAP01 (this needs to be done for the user to be registered correctly in WAP)
- Open a browser and go to: https://wap01:30091


 WAP Install screen in Web PI
 Database Server setup in WAP install
Validating the WAP installation succeeded:
- Log on to the WAP Server as Administrator
- Start IIS Management Console
- Check that the following IIS WEB Sites are created from pic below:
- Log on the SQL Server (SQL01) as SQL Administrator
- Open SQL Management Studio on the SQL Server as SA
- Check that the following Databases were successfully created from pic below:


Websites created after WAP Install
Configuring SCVMM and SPF
SCVMM Configuration
- Log on to SCVMM Server as Administrator
- Start the SCVMM Console
- In the SCVMM console go to Fabric – Servers – All Hosts and verify your Nutanix Cluster is available and also your shares are available.


- Once hosts have been verified, copy one or more syspreped vhds to the VMM Library (e.g. NTNXHYPERV-smb.nutanixbd.localNTNXHYPERV-libraryVHDs)

- Now create one or more clouds in SCVMM (in this case we created two: Contoso and Fabrikam, Microsoft default example companies) and assign one or more logical networks to the cloud. Make sure you leave Capability Profiles unchecked

- Under VM Networks, create a VM Network, a subnet and an IP Pool. Connect the VM Network to a logical network that was assigned to the cloud created earlier. (e.g. Contoso Tenant)

- Then create one or more hardware profiles (for example, small, medium and large)

- Create templates from the syspreped VHDs copied to the library (for example, Windows Server 2012 R2 Core and Windows Server 2012 R2 GUI)
 NOTE: – when creating the VM templates, in Hardware Profiles it’s not necessary to select one, for our example we created medium, then click next, and make sure that you select Create a new Windows Operating System Customization Settings, and select the operating system (for example, Windows Server 2012 R2 Datacenter). If this is not selected, the VM will not show up in the Windows Azure Pack Portal.
 - Select Settings
- Add the user under which the SPF Web Service (Application Pool) account is running to the Administrators group
Click Security > User Roles
Click Administrators > Members
Click Add and select the user that SPF Web Service (Application Pool) is running with. (See my SPF Blog Post)


 NOTE: – when creating the VM templates, in Hardware Profiles it’s not necessary to select one, for our example we created medium, then click next, and make sure that you select Create a new Windows Operating System Customization Settings, and select the operating system (for example, Windows Server 2012 R2 Datacenter). If this is not selected, the VM will not show up in the Windows Azure Pack Portal.
Service Provider Foundation Configuration
- Log on to the SPF Server as Administrator.
- Start Computer Management
- Select Local User and Groups
- Create a user you want to use for SPF by right click Users > new user (e.g. spf)
Note: This is not the same as the SPF Web Service (Application Pool). This is a local user on the SPF Server. - Click on the user and select the “Member Of” tab.
Note: Make the user member of all Groups starting with “SPF_”
- Verify that the SPF Web Service is running under the right user credentials
Note: The way SPF executes commands against VMM will be in the context of the user under which the web service is running.
To verify that the SPF Web Service is running under the right service account check the following:- Log on to the SPF server as an administrator
- Start IIS Manager
- Expand SPF Server > Sites and verify that SPF shows in the list.
- Select Applications Pools under connection menu
- Verify that both the SCVMM and Provider Application Pools are running under the account (Identity) that is also a member of the VMM Administrators


Configuring the Windows Azure Pack
In this section we will be configuring the following:
- Configuring VM Clouds Resource Provider in the Windows Azure Pack
- Configure SQL Servers Resource Provider in the Windows Azure Pack
- Configuring a plan in Windows Azure Pack
- Configure a Admin Account and a subscription in Windows Azure Pack
- Login as a Tenant and provision a VM and SQL Database to a Cloud
Configuring VM Clouds Resource Provider in the Windows Azure Pack
- Log on to WAP Admin Portal as an administrator (e.g. https://wap01.contoso.com:30091)
- Finish the Intro tour and click Ok
- In the main window, Select VM Clouds

- In the VM Clouds Window select Register System Center Service Provider Foundation
- Type the Service URL, Username and Password
Note: the User name and password is the user created locally on the SPF server and which was added to the SPF groups earlier in post

- Verify that the registration goes sucessful

- Register VMM: Go to VM Clouds – Clouds – Use an existing Virtual Machine Cloud Provider to Provision Virtual Machines, and provide the following info:
Virtual machine manager server: vmm01
Port number (optional):
Remote Desktop Gateway:
Click on register
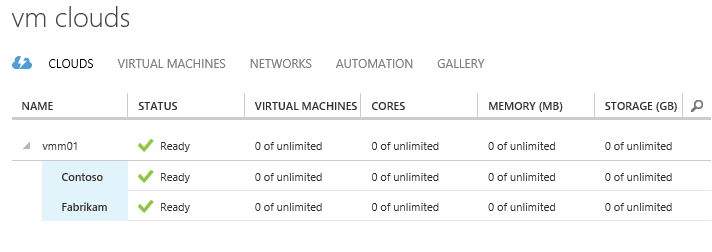
Verify that VMM Server registers correctly by selecting the server under clouds and verify that all clouds shows for the VMM Server


Configure SQL Servers Resource Provider in Windows Azure Pack
- In the WAP Admin Portal, go to SQL Servers
- Click on Add an existing server to the hosting server group
- In the wizard provide the following information:
- SQL Server Group: Default
- SQL Server name: db01
- Username: sa
- Password: ********
- Size of hosting server in GB: 20
 Note: The SQL Server used for the SQL server must have SQL Authentication enabled for the Service Provider service to work
- Verify that the following message shows in the status area

- Under Servers there should now be a new SQL Server showing

 Note: The SQL Server used for the SQL server must have SQL Authentication enabled for the Service Provider service to work
Configuring a Plan in Windows Azure Pack
- In the WAP Admin Portal, go to Plans.
- Click on + New -> PLAN -> CREATE PLAN
- Specify a name for the plan (e.g. Contoso)
- Select the service that should be offered via the plan (e.g. Virtual Machine Clouds and SQL Servers) and click next

- Skip add-ons and click Ok
Note: In our scenario we created two plans: Contoso and Fabrikam. - Under plan verify that the new Plan(s) shows in the list

- Click on the first plan created
- Under plan service, click on Virtual Machine Clouds
- Select the VMM Server (There should only be one in the list).
- Under Virtual Machine Cloud, select the Cloud for which you would like to use with the plan (e.g. Contoso)
- Under Usage limit, specify the usage limits that the plan should use

- Under networks, click Add network
- Select the VM networks that should be used for the plan and click Ok

- Click Add hardware profiles
- Select the hardware profiles that should be used for the plan and click Ok

- Click Add Templates and select the templates that should be used for the plan

- Under Additional settings, select the actions that should be allowed within the plan
- Click Save
- Verify that the plan service shows as configured and Active for both services


Configure a Admin Account and a subscription in Windows Azure Pack
- In the WAP Admin main menu click User Accounts
- Click + New -> User Account > Quick Create >
- Provide the following information:
- E-mail: eg. admin@nutanixbd.local
- Password: *******
- Select a plan (e.g. Contoso)
- Click Create
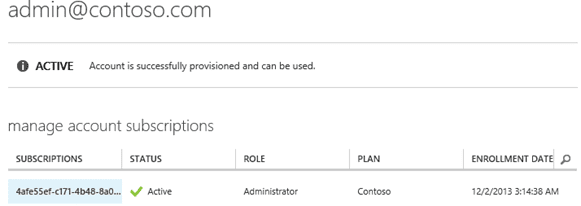
- Click on the newly created user and verify that a subscription shows.

Login as a Tenant and provision a VM and SQL Database to a Cloud
- Open a browser and go to the WAP Tenant Portal (e.g. https://wap01.contoso.com:30081)
- Specify the user account created earlier and password (e.g. admins@nutanixbd.local)
- Click on Submit
- Finish the introduction wizard
- Click on Virtual Machines
- Click Create a virtual Machine Role
- Select Standalone Virtual Machine
- Select From Gallery -> Templates
- Select a template in the list and click Next

- Provide the following information of the VM
- Name: e.g. Contoso01
- Password: ********
- Product Key
Note: Depending on what kind of sysperped image is used, it’s necessary to provide a product key. Only if the image is build using a Volume License image it might not be needed to provide a product key.
- Select a network for the Virtual Machine e.g. Contoso Tenant (this is the network that was selected when creating the plan)

- Click Next

- Go to System Center Virtual Machine Manager 2012 R2 Server and start the SCVMM Console
- Select Job and Select Running
- Verify that one job shows provisioning the virtual machine

- Go back to the WAP Tenant Portal
- Select SQL Server Databases
- Click Add a New Database
- Specify a Name for the Database (e.g. DB01)
- Click Next
- Provide a User Name and a Password (e.g. dba01)

- Click Ok to create the Database
- Verify that the job completes with success.

- Click on All Items
- Verify that a VM and a Database shows in the list


Thats it…you did it…you build your own IaaS on Nutanix…I hope this blog post will help you with installing and configuring Windows Azure Pack on Nutanix. If you run into any issues, during the deployment, please feel free to post a comment.
Until next time, enjoy building your Nutanix Windows Azure Pack IasS offering!
Rob