Nutanix SCVMM Fast Clones Plug-in

Hi Everyone…I love to show off the cool Microsoft integrations that Nutanix has and most recently Nutanix released System Center Virtual Machine Manager (SCVMM) 2012 R2 Fast Clones plug-in.

With NOS 4.1.3, Nutanix has released a Fast Clone plugin for SCVMM.  The plug-in has the ability to provide space efficient, low impact clones from SCVMM and quickly. The plugin is a wrapper around Nutanix powershell commands for Fast Cones. The plugin does need proper access rights to the Hyper-V hosts and SCVMM and already should be setup for most environments that have Nutanix with Hyper-V deployed.  You will need to install the plugin on the SCVMM host along with the Nutanix powershell command-lets.

Once you have the SCVMM Fast Clones plug-in installed, you can start creating Fast Clones right away. Installation is quick and easy and creating clones is just as easy as shown below.

To create VM clones using the Nutanix Fast Clones wizard, follow the below steps:

  1. Start the SCVMM
  2. Navigate to the Nutanix hosts.
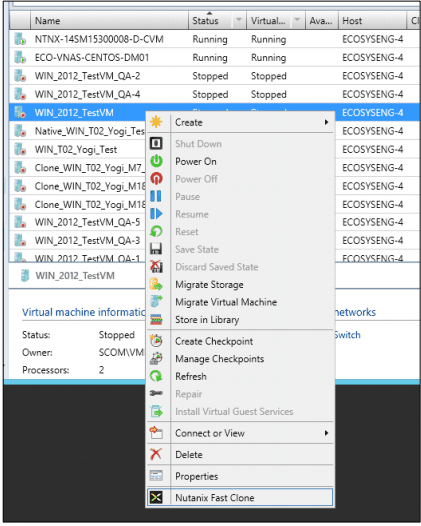
  3. Select a host and then select the VM to be cloned.
  4. To invoke the wizard, do one of the following: Click the “Nutanix Fast Clone” button on the top menu-bar. Right-click the target VM and select “Nutanix Fast Clone” from the pop-up context menu:
    fastclones2 Fast Clones
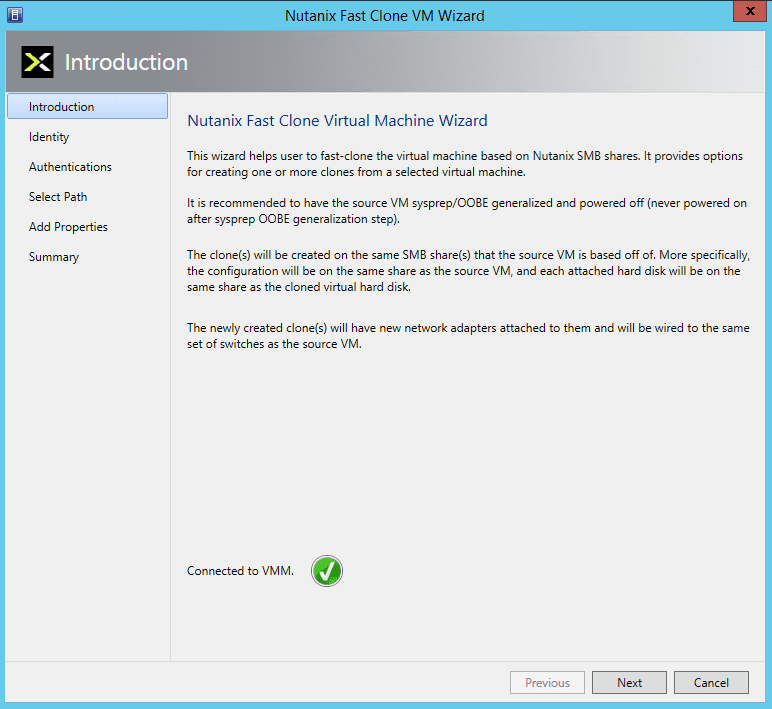
  5. In the Introduction screen, read the instructions and then click the “Next” button.  NOTE: On start of the wizard, it makes a connection to the VMM to be able to communicate with it to run SCVMM PowerShell cmdlets to gather information about the selected VM.
    fastclones1 Fast Clones
  6. The “Identity” screen is displayed. The “Source VM Name” and “Source VM Host Name” is prepopulated, enter the following information and then click the “Next” button:
    1. Clone Type: Click the “Clone One Virtual Machine” radio button and enter a name for the clone when creating a single clone or click the “Clone Multiple Virtual Machines” radio button and enter the following information:
      1. VM Prefix Name: This is the root part of the new VM name.
      2. Beginning Suffix: a number to start the numbering of the new VMs
      3. Number of Clones: a number between 1 and 100.
        fastclones3 Fast Clones
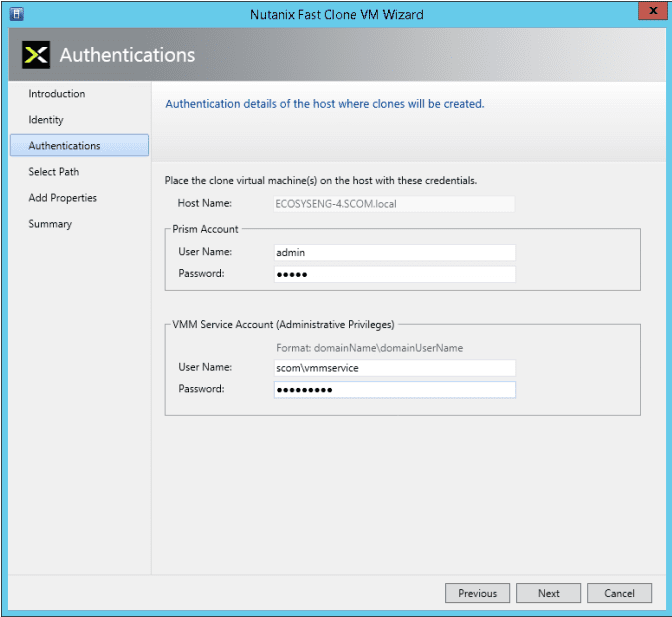
  7. In the Authentication screen, enter the Prism and VMM Service Account user names and passwords in the appropriate fields, and then click the “Next” button.
    fastclones4 Fast Clones
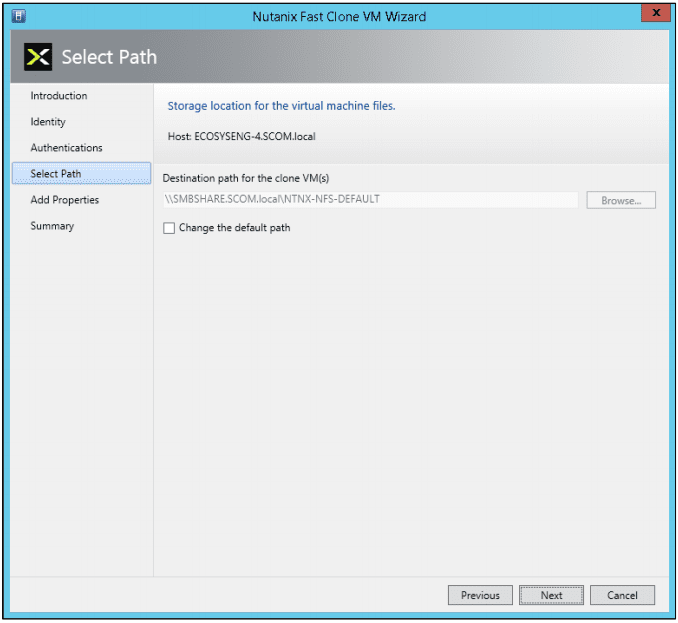
  8. In the “Select Path” screen, select the destination path and then click the “Next” button. Leave the default path “as is” or change it to a new path as needed by clicking the “Change the default path” box. Click the Browse button to select a destination path for the clone VMs. This is the path where virtual machine configuration files will be stored. The path must be on the same Nutanix SMB share as the VM configuration file.
    fastclones5 Fast Clones
  9. In the “Add Properties” screen, click the appropriate radio button to either power on or not power on the VMs after cloning and then click the “Next” button.
    fastclones6 Fast Clones
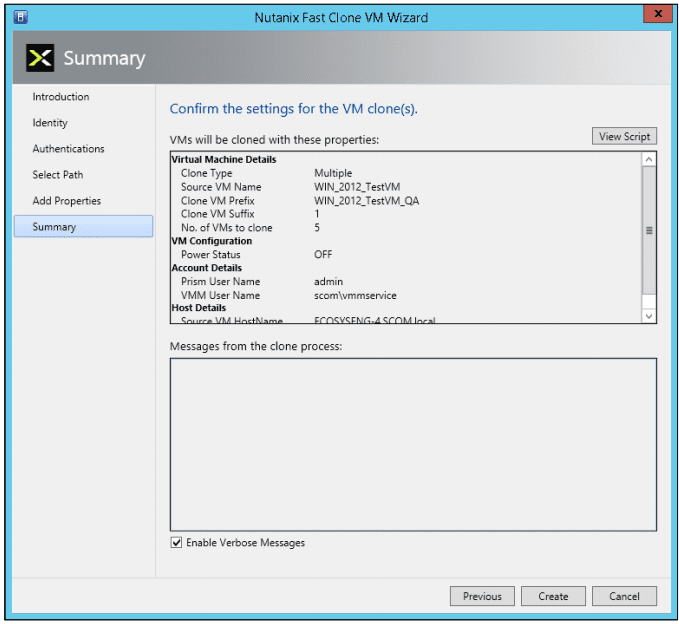
  10. In the Summary screen below, review (confirm) the settings are correct.
    fastclones7 Fast Clones
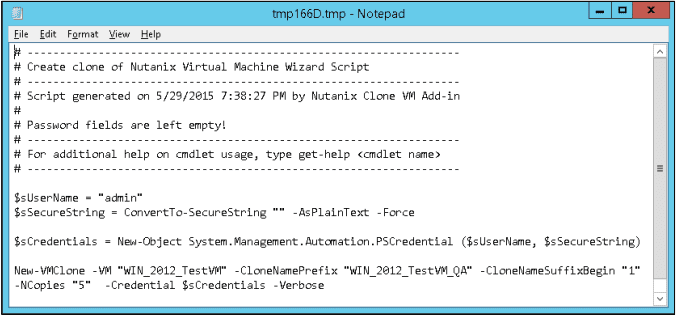
    Clicking the “View Script” button displays the script to be executed:
    fastclones9 Fast Clones
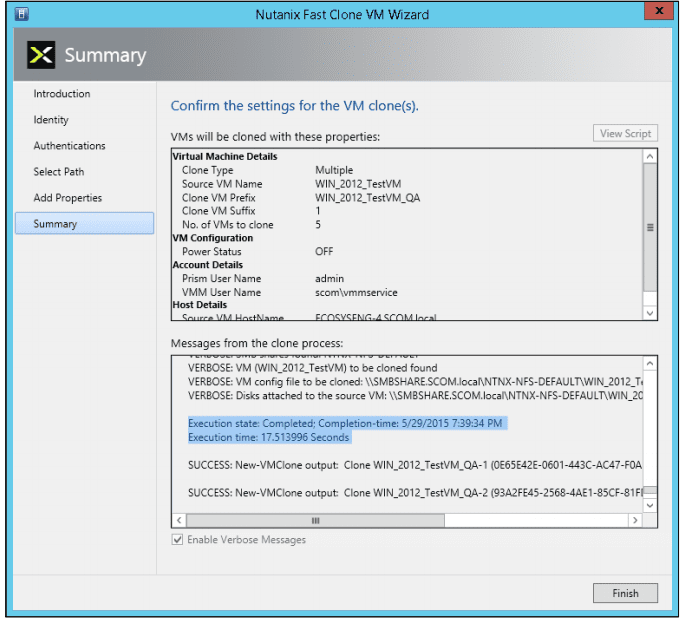
    Clicking the “Enable Verbose Messages” displays detailed log messages as the VMs are being created.
  11. When the settings are correct, click the “Create” button to create the cloned VM(s). An hour glass is displayed and progress messages are displayed.
  12. After the clones are created, click the Finish button to close the wizard and you just created VM’s at lighting speed.fastclones10 Fast Clones

If you want to check out Fast Clones for your environment, you can download Fast Clones from the Nutanix Portal at https://portal.nutanix.com.

Below is a demo video shows traditional cloning vs Fast Clones that my buddy @mcghem created.  It shows the awesome benefit of Fast Clones.

https://youtu.be/cWGEvjHZxdw

As always, if you have any questions please post a comment.

Until next time….Rob

Understanding Windows Azure Pack – How to guide with Express Edition on Nutanix – Environment Prep – Part 3

To continue the Windows Azure Pack series, here is my next topic:  Windows Azure Pack – Environment Prep
If you missed parts 1 or 2 in the series, check links below:
Part 1 – Understanding Windows Azure Pack
Part 2 – Understanding Windows Azure Pack – Deployment Scenarios

Environment Prep

In the first blog posting in this series we examined the capabilities and benefits of deploying WAP (Windows Azure Pack) in enterprise datacenters by first looking at Windows Azure, Microsoft’s public cloud offering.
In the second blog posting we looked at some of the terminology associated with WAP and we summarized two kinds of deployment scenarios on Nutanix: Express and Distributed architecture
Moving on…”Cloud” is the buzz word in all aspects of our computing life today, and more and more companies want to be able to offer the benefits of a “Cloud” environment to their on premises users. And by now, we should all know the Public Cloud (i.e. Azure, Amazon, etc.) might not suit everyone and is definitely not suited for all situations….That is where Nutanix and WAP standout;
Giving your the ability to have a predictable, scalable , highly available, high performing IaaS (Infrastructure as a Service) hybrid datacenter
This series is meant to be a guide to building your own WAP test lab on Nutanix and also provide you guidance for building out a production Nutanix WAP environment.

WAP Test Environment Requirements

Just to see functionally, you could deploy it the requirements on one host with Nutanix CE (Community Edition), but building this WAP environment on a Nutanix cluster will give you real world results.
In this series, we will be building 2 VM’s for the WAP test environment. The VM’s consist of SPF (Service Provider Foundation) Server and Windows Azure Pack Server.
In my test lab, I am using a 4 Node Nutanix NX3050 Cluster with Server 2012 R2 Hyper-V. This blog post assumes you have an Active Directory Domain and SCVMM (System Center Virtual Machine Manager) 2012 R2 up and running. It also assumes you have an empty SQL 2012 SP1 server built for hosting SPF, WAP and Tenant SQL Databases.

In this Post:

WAP Pre-requisites:

  • Virtual Machine Manager is installed and configured and:
    • Member of the Active Directory domain.
    • One or more SCVMM Clouds created in SCVMM (see below video)
    • One or more VM Networks created in SCVMM (see below video)
  • Service Provider Foundation
    • Windows Server 2012 R2
    • 4 Gigs of RAM
    • 2 CPU Cores
    • Database Storage
    • Member of the Active Directory domain
  • Windows Azure Pack Server
    • Windows Server 2012 R2
    • 4 Gigs of RAM
    • 2 CPU cores
    • 20 Gigs Data Storage
    • Database Storage
    • Member of the Active Directory domain
  • SQL Server is installed and running
    • Windows Server 2012 R2
    • SP1 or Above
    • 16 Gigs of RAM
    • 2 CPU Cores
    • 100 Gigs Data and Log Drive
    • With Mixed or SQL Authentication enabled
    • Member of the Active Directory domain

If you need help building a SCVMM 2012 R2 Server, check out my blog post on Installing SCVMM 2012 R2 on Nutanix (coming soon).
If you need help building a SQL 2012 Server, check out my blog post on Install SQL 2012 on Nutanix (coming soon)
If you need help deploying Hyper-V to a Nutanix cluster and joining the cluster to an Active Directory Domain, see my buddy Chris Brown’s Blog Video on Installing Hyper-V on Nutanix. This also covers adding it to SCVMM 2012 R2. He also has a great Hyper-VSCVMM Networking Overview. Another great NutanixMicrosoft resource.

Installing Hyper-V on Nutanix

Hyper-V Networking Overview


SCVMM Server / Fabric Prep

Account requirements

The Active Directory security account groups below are recommended as best practices when deploying WAP with SCVMM. Active Directory Security were created and mapped in SCVMM as Delegated Administrations. See screenshots below.

Self-Service Users (tenants) storage of VMs in the SCVMM Library

You will also need to create a library share, or create a folder in a library share that will serve as the storage location for tenants. Also, understanding that self-service users must have the Store and Re-Deploy permission to store their virtual machines in important. In my test lab, I created a Nutanix container (SMB Share) with compression attributes and presented it to SCVMM.

IMPORTANT RULES FOR LIBRARY SHARES
  • The library share location that you designate for stored virtual machines must be different from the shares that you designate as read-only resource locations for the private cloud.
  • The path or part of the path must be unique when compared to the user role data path that is specified for a self-service user role
  • You could also create entirely separate library shares with containers on Nutanix,like I did above
  • Understand that you will configure the stored virtual machine path and read-only library shares when you run the Create Cloud Wizard as shown video below.
  • The self-service user role data path is specified when you create a self-service user role or modify the properties of a self-service user role.
  • Make sure that one or more library shares exists that you can assign as the read-only library shares for self-service users to use.
  • The library shares that you designate as read-only resource locations for the private cloud must be unique when compared to the library share or shares that are used for stored virtual machines and for the user role data path that is specified for a self service user role.

Creating Tenant Storage and Private Cloud in SCVMM 2012 R2 on Nutanix

In high level, best practices is to have each tenant how their own separate storage containers as shown in below diagram. This will allow you to advertise available capacity, security boundaries, and apply attributes, like deduplication or compression on a per container basis and then tie it up to storage classifications in SCVMM.

Next is to create storage for you tenants. In Prism, create a new container with the name of your tenant, set an advertised capacity and add any storage attributes, like deduplication or compression depending on the type of workloads being hosted. See the below a video I produced with my buddy @Mike TME at Nutanix of the process:

YouTube player

If you have any questions about the prep, please comment below.
Yea, now we can finally deploy the WAP. Now the fun part starts…..
Next up in my series, Installing the Windows Azure Pack environment on Nutanix – Deploying SPF (Service Provider Foundation)

VHD vs. VHDX: Hmm….What’s the Difference

I get asked this all the time….and here is my answer. Microsoft’s virtual hard disk format, VHDX, has some important advantages over the legacy VHD format, as this VHD vs. VHDX comparison shows.

The release of Windows Server 2012 brought many new virtualization improvements, but one that caught the eye of many IT pros was the introduction of the VHDX file format. Windows Server 2012 supports the new format but also lets Hyper-V administrators use the legacy VHD format. With two virtual hard disk formats to choose from, let’s take a minute to talk about VHD vs. VHDX.

Continue reading